I will be taking 3ds Max and Vray lighting workflow as a reference to recreate the same in Unreal Engine 4. Main focus will be on Unreal Engine, just giving reference to 3ds max and Vray settings. (It’s not a 3ds Max and Vray Tutorial)
General Lighting methods prevailing in Arch-Vis industry using 3ds Max and Vray –
- Exteriors (Combinations)
- VraySun + VraySky
- VrayDomelight with HDRI + Directional Light (For simulating sun, if required)
- Artificial Lights as per requirement (mainly in Dusk shots)
- Interiors (Combinations)
- VraySun + VraySky + Vray Skyportals
- VrayDomelight with HDRI
- Artificail lights as per requirement (used as fill lights or sometime required to create a desired mood)
* Artificial lights – Any Vray light (Area, point, IES etc) used as fill light or to create any specific mood.
I will be recreating this workflow concerned with HDRI and Directional light as SUN light for Interiors and Exteriors. It is imperative that we first know how to use HDRI correctly to simulate proper lighting with correct exposure.
In above scenarios (Exterior and Interior) VrayPhysical Camera plays a vital role in simulating DSLR exposure with physically accurate lighting values (Real life light intensity values in Luminance or Radiance).
It is important to know why we use Physical Camera features in any Rendering Engine. In real life, human eye plays a critical role in compensating for difference in light intensities we encounter on daily basis by controlling amount of light entering, through increasing or decreasing iris size.
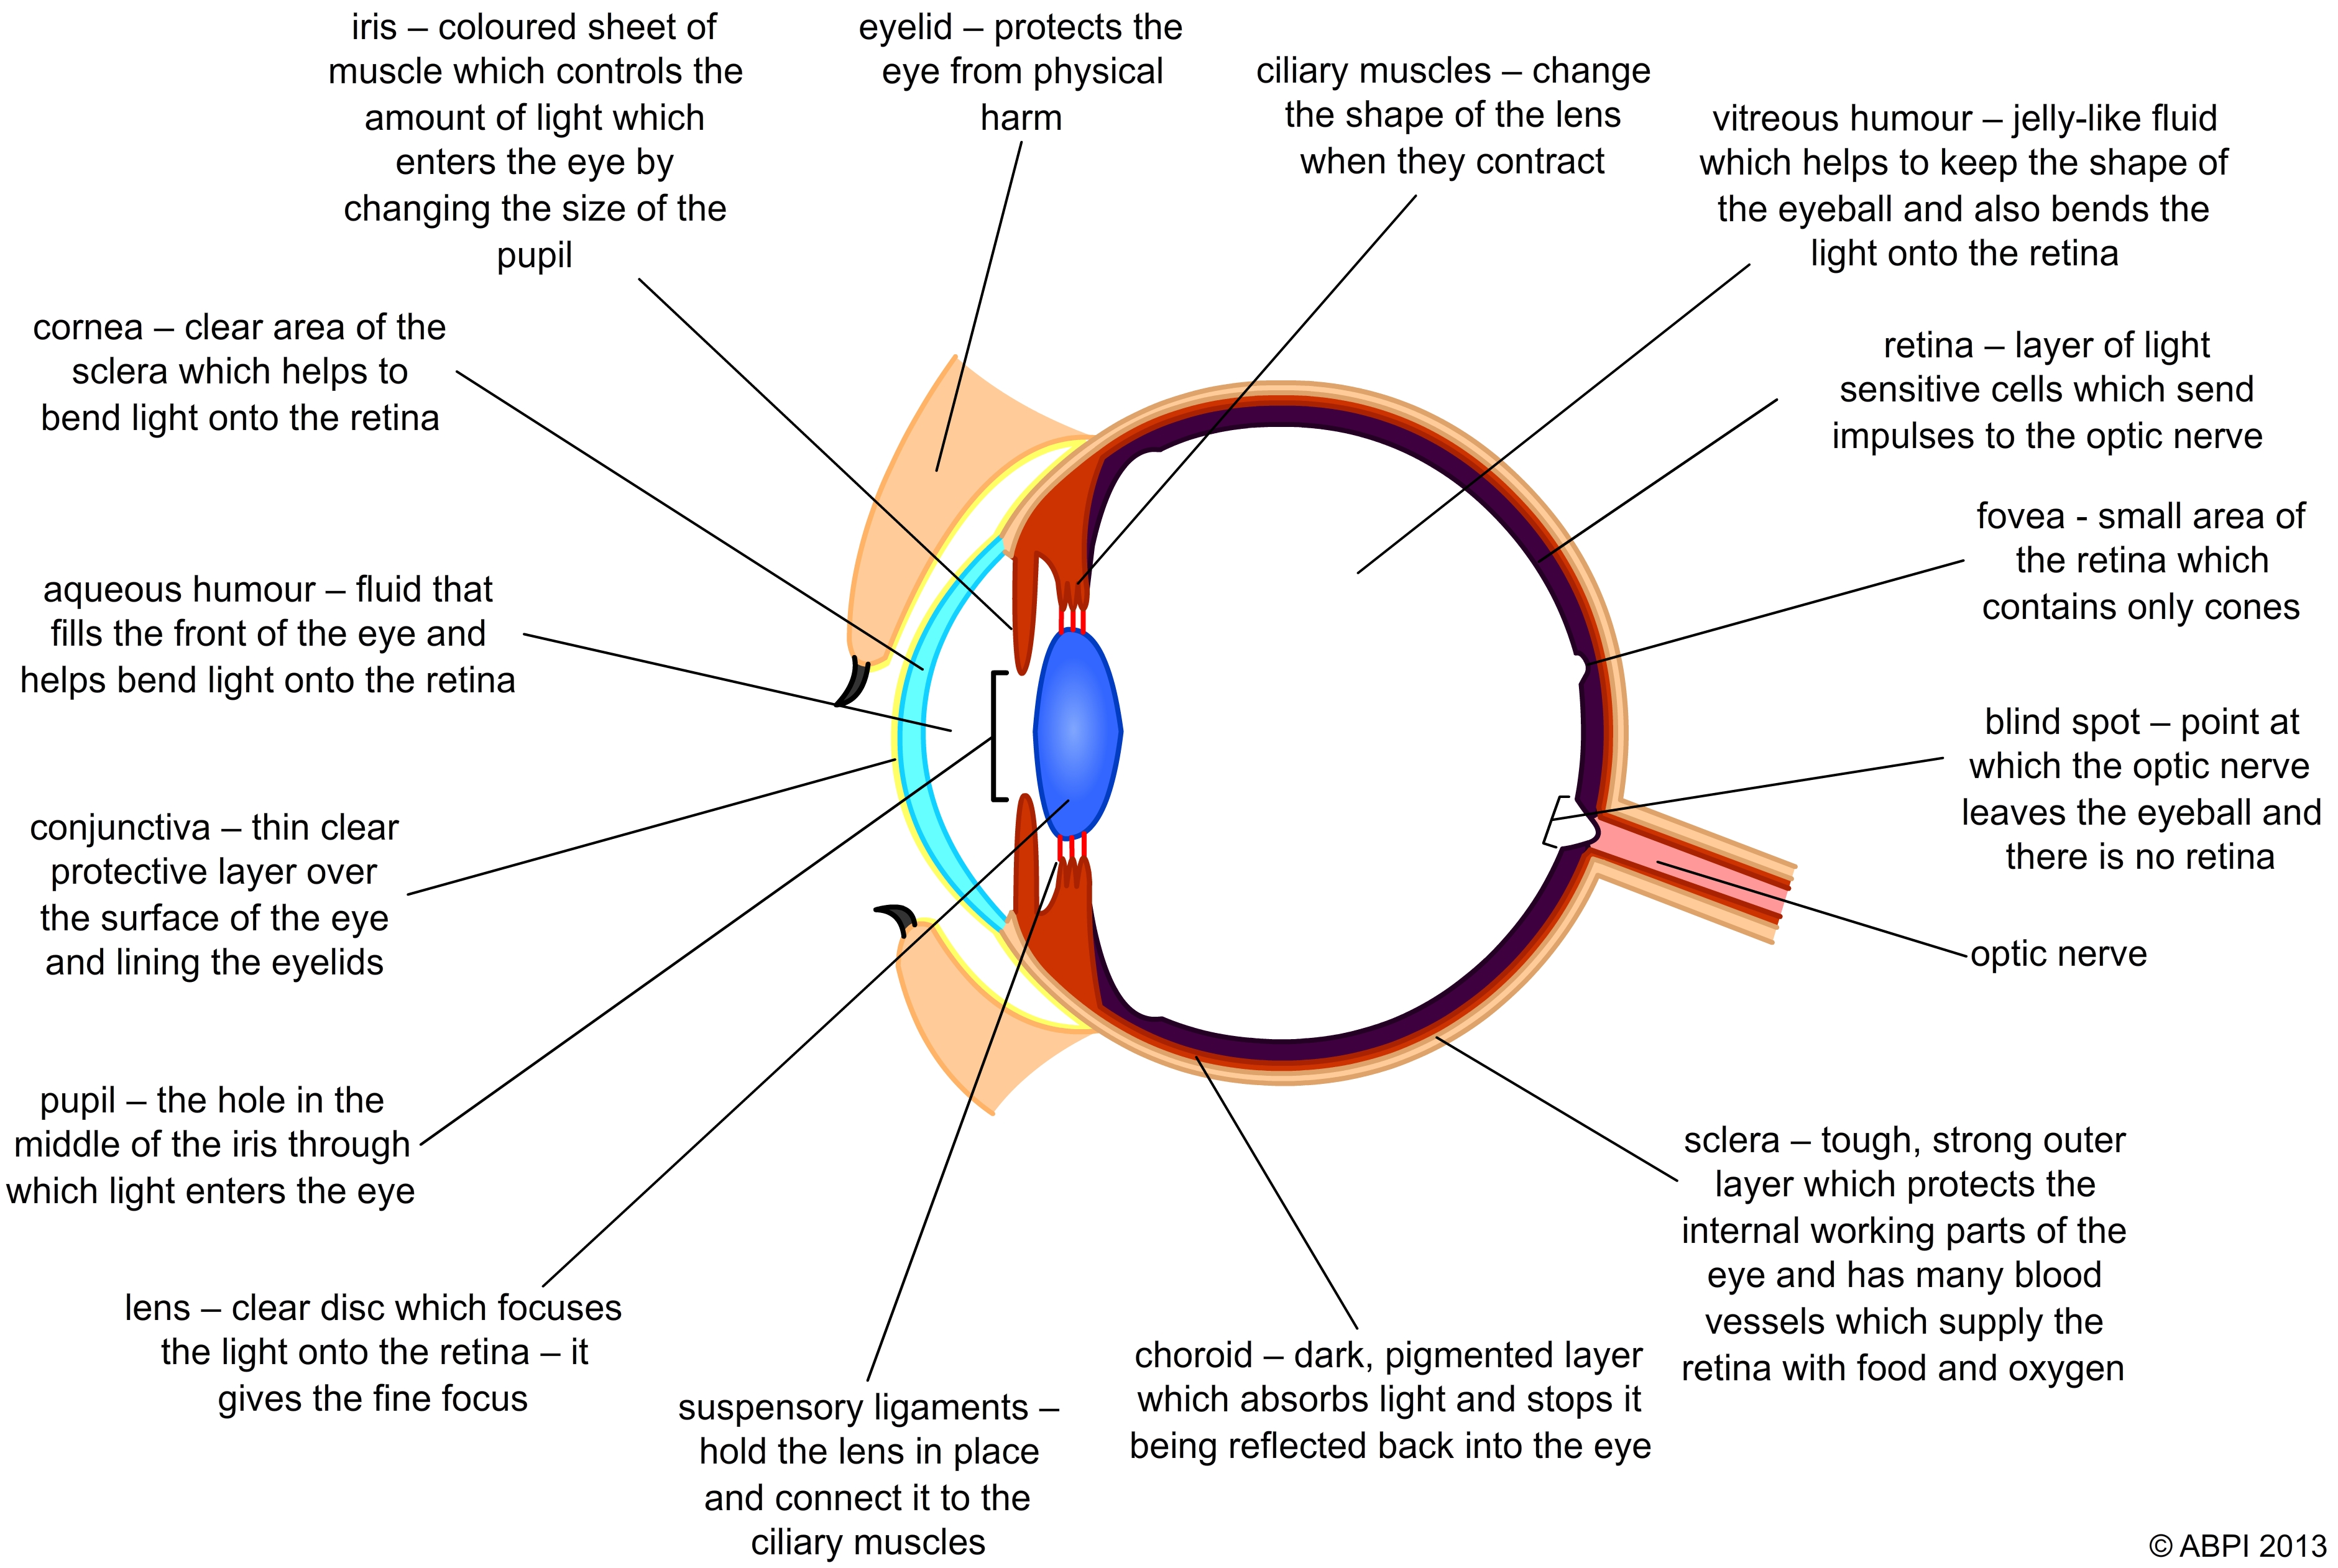 Image Source – http://www.abpischools.org.uk/page/modules/nervoussystem/nervous7.cfm?coSiteNavigation_allTopic=1
When it comes to simulating human eye behavior technically, DSLR Cameras come really close to do so with ample amount of control and as we are already using these cameras to take photographs of our surroundings, it is easy if we recreate those settings virtually in our rendering engines also. It’s a well-known fact that to render virtual images/environments, basic knowledge of photography and light behavior plays a critical role.
Reading these articles will certainly help a lot (highly recommended)
http://www.cambridgeincolour.com/tutorials/cameras-vs-human-eye.htm
http://petapixel.com/2012/11/17/the-camera-versus-the-human-eye/
When we take photographs with DSLR camera on “Manual mode”, we start to get an idea about the settings concerned to capture “what we are seeing in real time” and “what we are getting as photograph” ( not too bright or too dark). I will not be divulging much into DSLR and Manual settings more, but that does not mean I will leave it here as it is – for all the techno freak guys, reading this material will certainly help (I highly recommend going through this) –
http://digital-photography-school.com/megapost-learning-how-to-use-your-first-dslr/
Question – Why the hell I am reading about human eye and DSLR camera in a blog concerned with light setup in Unreal Engine?
Answer – It’s always important to understand basics that are concerned with lighting workflow irrespective of application and also Unreal Engine got this awesome “Eye Adaptation” already incorporated in the form of “Auto Exposure”. But to understand that properly, it’s important to get some basic idea first.
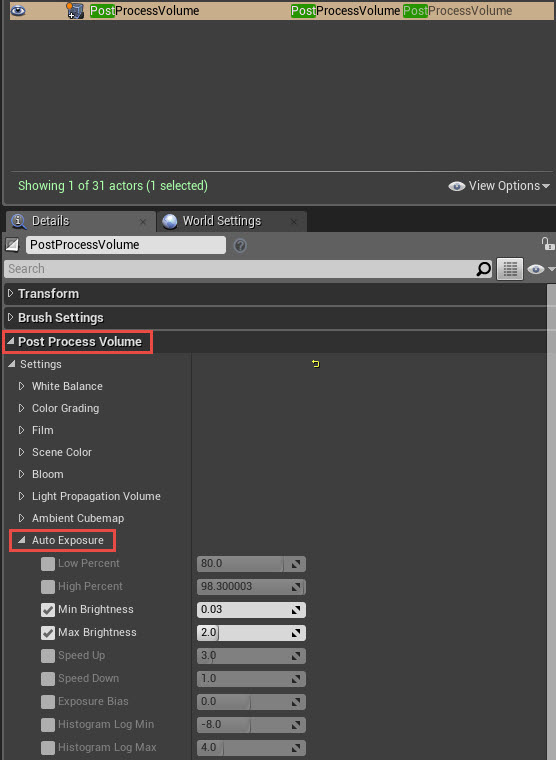
In Unreal Engine when we create a scene, which covers both exteriors and interiors simultaneously, controlling light balance becomes somewhat difficult due to variation in light intensities concerning exterior and interior environment. Also as character moves like a real human being in interactive environment, it’s wise to simulate human eye adaption in Engine itself to create realistic feel and workflow. All the information regarding the Auto exposure is given in the following link –
“Auto Exposure” settings are in the Post Process Volume.
“I will try to persuade EPIC to include Physical Camera settings in Engine. It will make the Engine’s Lighting workflow as per with other render engines, which in turn will be super easy to migrate and understand.”
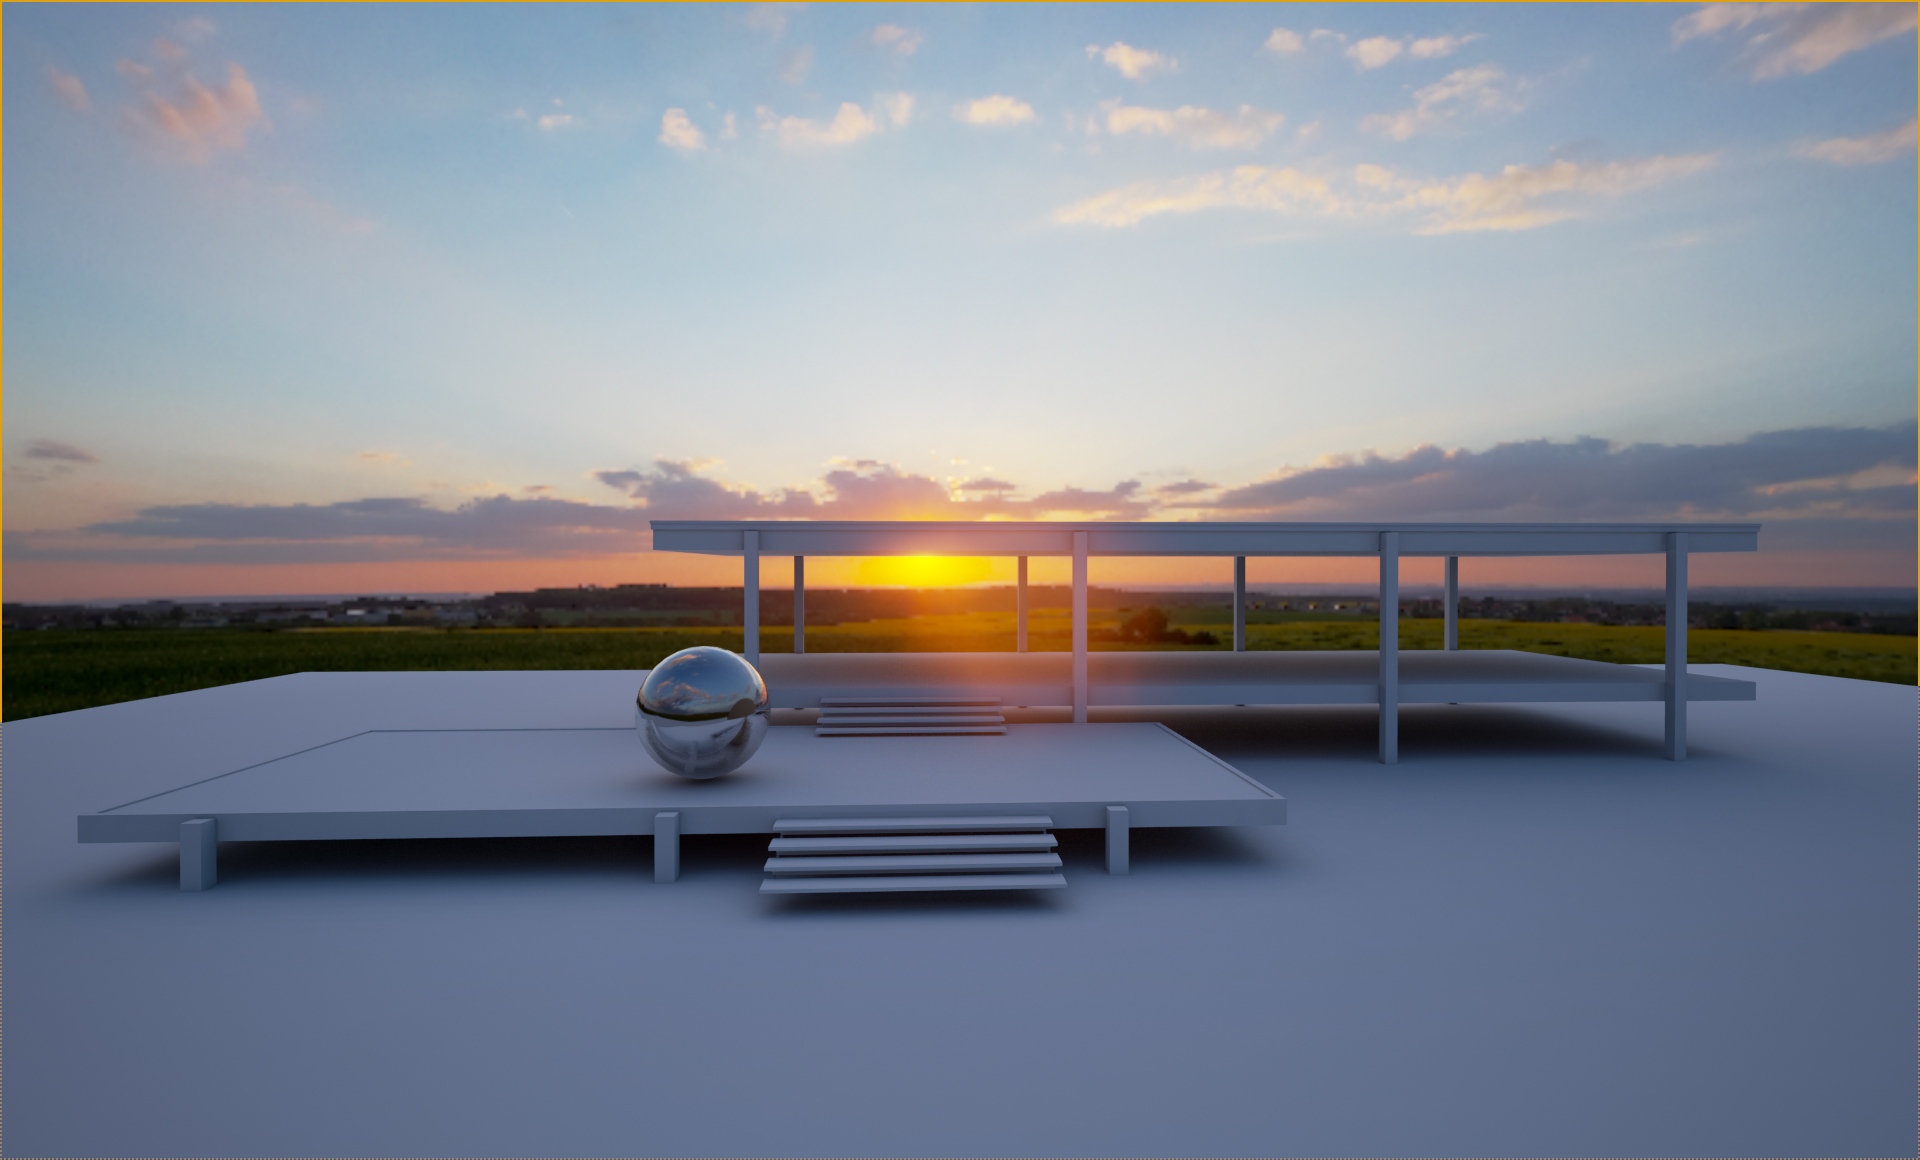
Now as we have some basic understating about the exposure settings in the Engine, we will proceed with creating a simple scene only lit by HDRI. I am assuming that my readers have some basic knowledge of Unreal Engine, so will skip some fundamental steps.
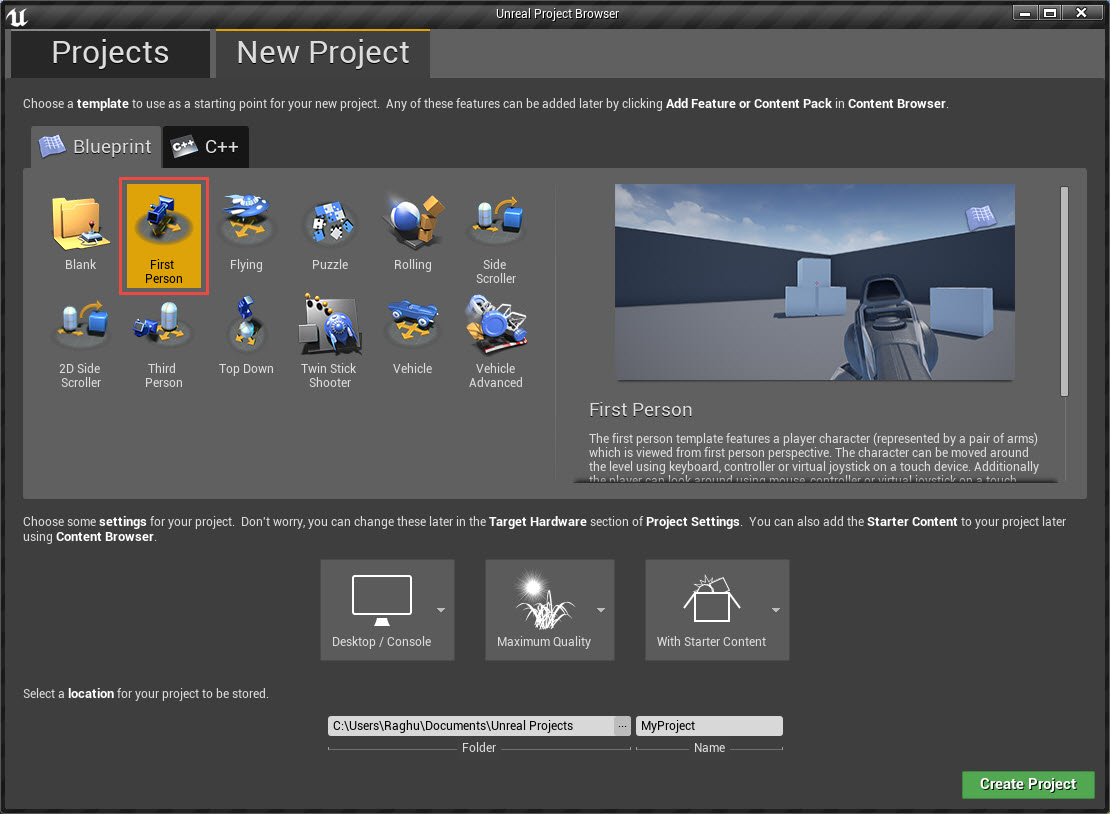
Open Unreal Engine and create a new project by selecting “First Person Template”
In this project we will create a new “empty level” for our HDRI workflow (save it before starting work).

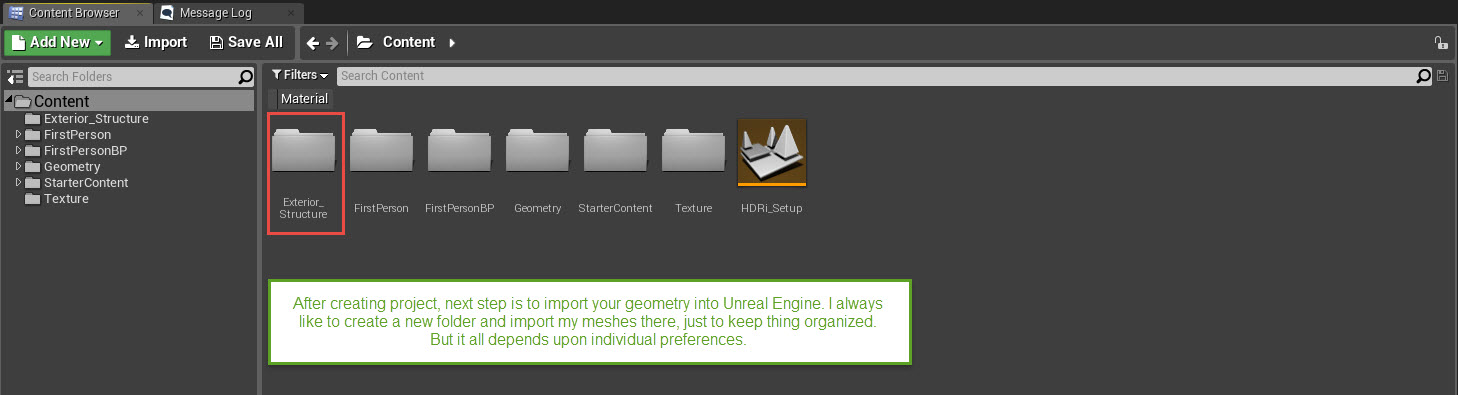
Now import your geometry/meshes into content folder of Unreal Engine (For more details about elaborate steps involved – see this tutorial)
Disable Auto Exposure from project settings

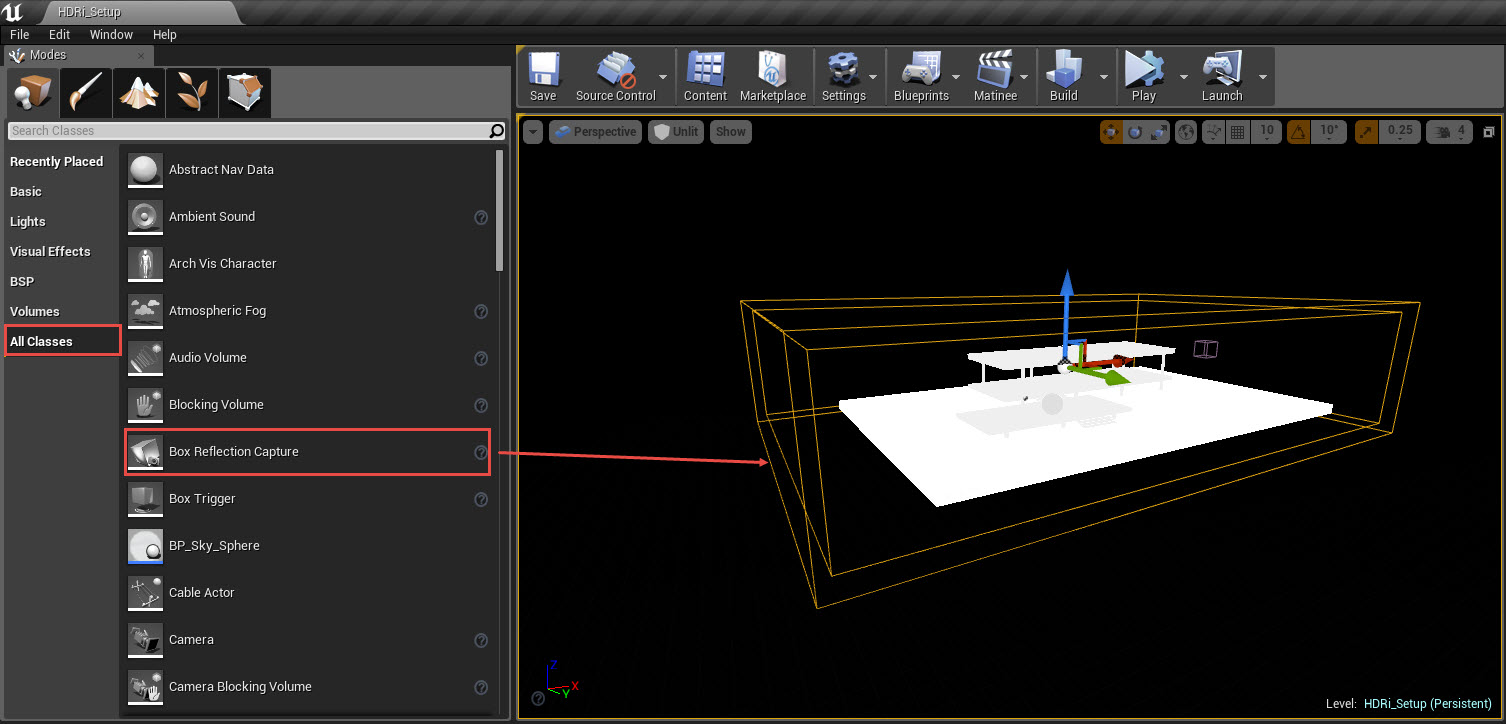
After that we will create “Lightmass Importance Volume” covering all of our meshes in the level which are going to render.
 Next step will be of creating Box Reflection Capture wrapping entire meshes. This is very important for simulating correct reflections on objects inside and outside the building, you can also use large sphere reflection capture in exteriors (results want change that much).
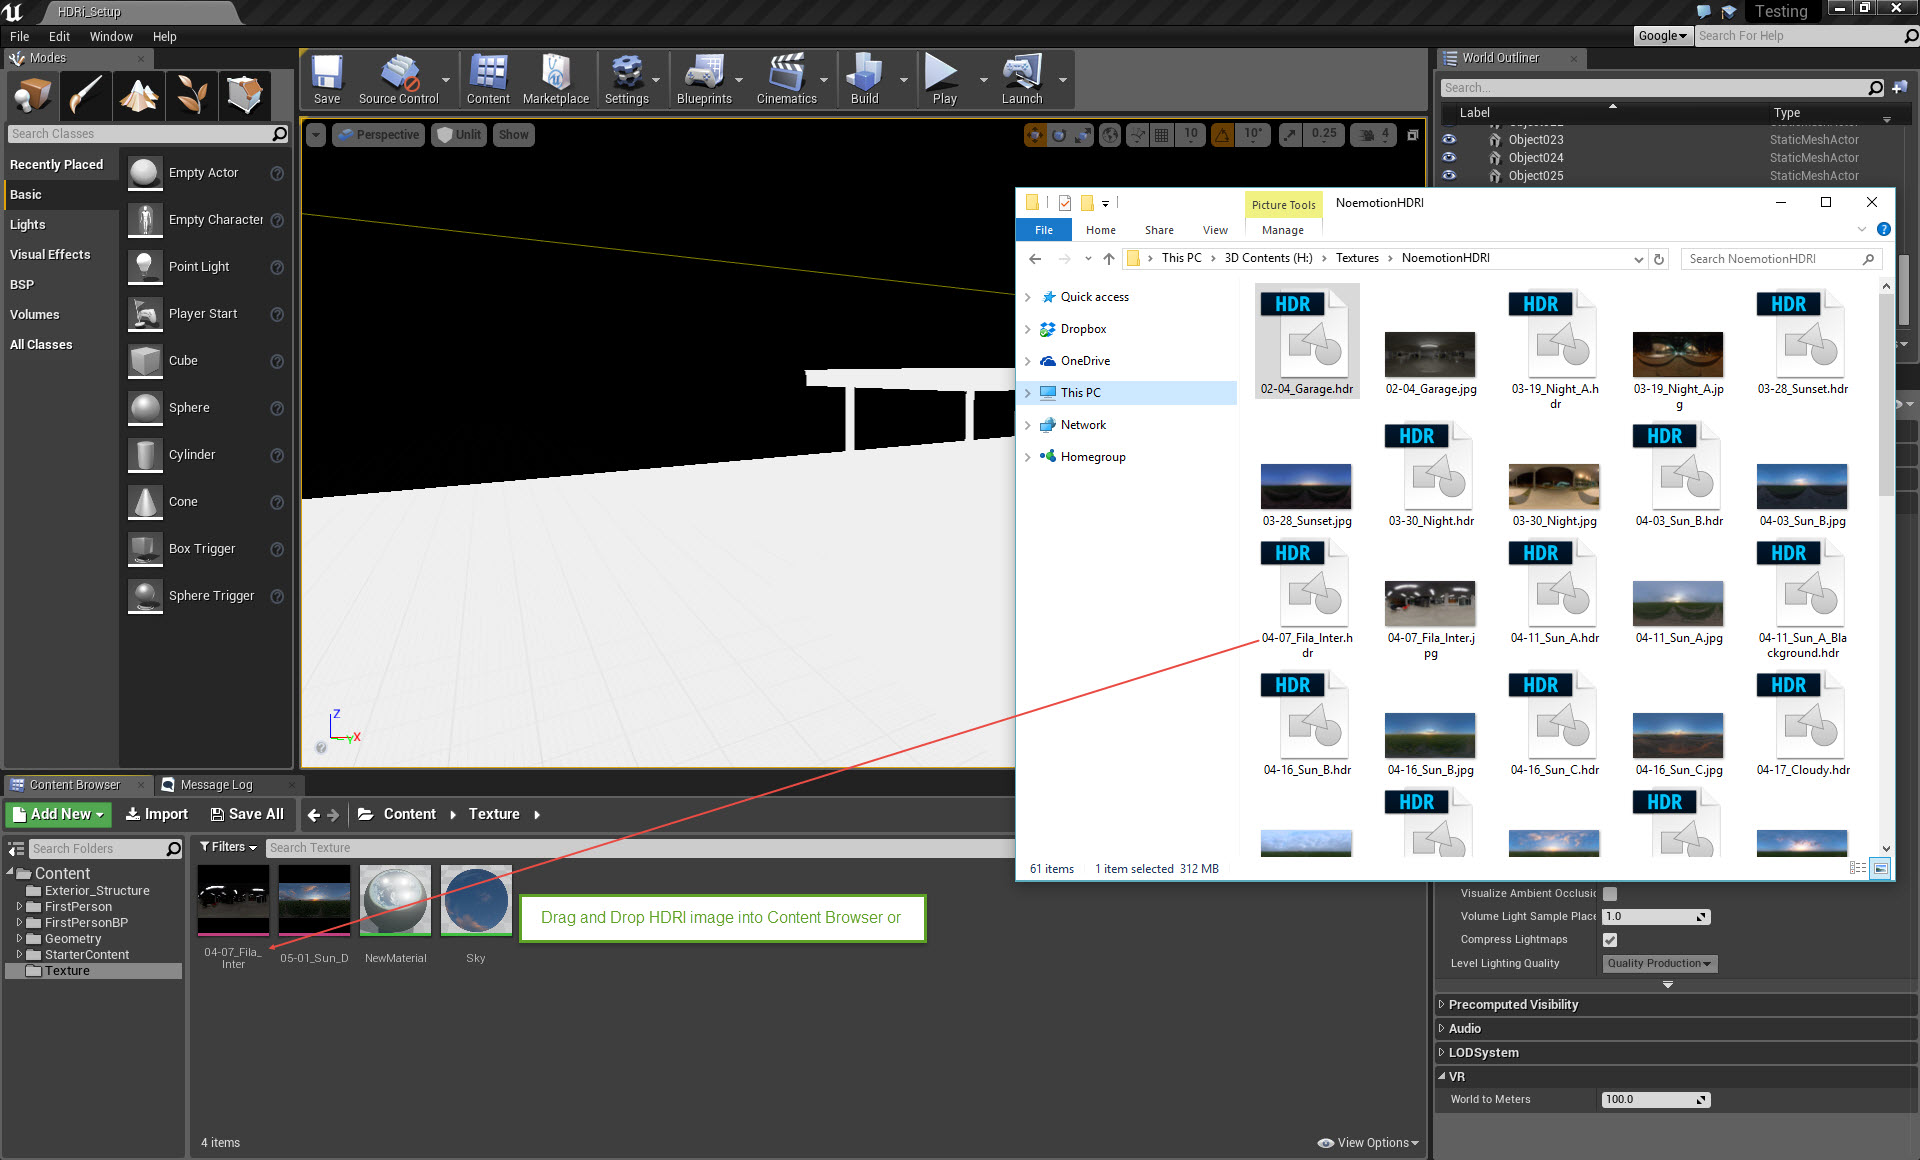
 Now it’s time setup HDRI as our environment background and create “Skylight” that will use the same HDRI for lighting but before that we have to import our HDRI into Engine. There are several methods to do so but we will go for the easiest one i.e. Drag and Drop.
I am using HDRI’s from – http://noemotionhdrs.net/ It’s one of the best free resource for HDRI.
nice rag!
Excellent tutorial, really useful… thank you so much for doing this 🙂
That is really helpful and well explained. Thank you!
hello,
very ineresting
how can you control intensity of lightning and shadows of the scene in casewhen hdri is not giving enough light to show mesh/model?
and how you control scale? to have mesh relating proportions to hdri space ?
Adding a Post Process volume will do the job. I have added this info above.
Hello,
I followed your tutorial is great but I wondering it miss some element no ?
When I import a HDR into Unreal, the compression setting is set to HDR RGB no sRGB and so sRGB is unchecked, and into the material I got error and so I need to put the compression setting to default and check sRGB.
Then I need to put the HDR at 0.05 in brightness if not it’s only white.
And I really don’t know how do you get the hdr at this beautiful resolution, I can only get the hdr blurred in 512×512.
Do I miss something.
Thanks !!!
Fabien
Hi Fabian,
I have added the information required to get the best resolution out of HDRI, check it above.
Colour information contained in some HDRI’s tends to blown away the lighting information, as we use HDRI inverse gamma and overall multiplier in VRayHDRI map, you can safely decrease the HDRI brightness as required to get the desired results.
Hello, I am not able to find information to increase the HDRI’s resolution from 512×512 to its original size. Can you please help?
hi,
nice tutorial, but i also guess there is something missing…i tried to recreate this scene with my own models and it doesn’t look like your endresult….do you have a directional light added? because i don’t see shadows in my scene, but yours is well shadowed…
how can i adjust the exposure of my hdri? is it possible to change it not in the post processing volume?
Yes he has a directional light included in the scene. But it doesn’t affect the world, so I don’t know why it’s included in the project file
thx you very much for the tutorial file…
than you very much,
This tutorial are super easy to understand with details explanation.
Can’t wait for the next tutorial.
HI raghu excelent tut, i want to ask one thing what if i rotate the sky hdri through material constant node will it effect sky light automatically? how do i link hdri sphere to sky light?
Hi Sam,
In my thread on Unreal Engine Forums – https://forums.unrealengine.com/showthread.php?88952-Lets-make-Lightmass-EPIC-%28and-understandable%29/page6
User mihanix post #220 on Page No -6 provided a wonderful way to rotate skylight HDRI in-sync with background HDRI
hi.
thx for this tutorial.
i jot an error when i “sky sphere material”
– i have import your same HDRI in unreal (drag and drop)
– in sky sphere material i drag and drop the texture
– in sky sphere material if i attact “texture sample” box in “emissive color” i get ERROR
– the errore detail is [SM5]
– i tried with another HDRI and i get same error
why?
EXACT same issue here!
any help pr hint would be appreciated!
Kindly specify the error you are getiing
The error I got is:
Error [SM5] (Node TextureSample) Coercion failed: MaterialFloat3 Local4 = (Local1 / Local3);
: float3 -> float2
I could get you a screenshot, but appears not to be possible in the comment area
greets
Try to recreate the whole materials as this – http://rag3dviz.com/wp-content/uploads/2015/12/Editorsky-Maetrial.jpg
If possible, upload the Screenshot of the Material you are using as an image on Dropbox or something like that and share link here. It’s a common error and can be corrected easily, but I need to know what exactly you are doing wrong.
That´s what I did 🙂
https://www.dropbox.com/s/c3j1hvl5hox9ytg/error.jpg?dl=0
That´s what I did 🙂
https://www.dropbox.com/s/c3j1hvl5hox9ytg/error.jpg?dl=0
You are not using a HDRI image here or settings are not correct – See the attached image for solution
https://www.dropbox.com/s/2jmlmj96dmj05kt/User%20Question.jpg?dl=0
Hey Raghu,
I really appreciate your help, I´ve downloaded some “real” HDRs and got it right so far, the problem is now UE4 says when rendering this:
Error EditorSkySphere Object has overlapping UVs.
Info EditorSkySphere Lightmap UV are overlapping by 50.0%. Please adjust content – Enable Error Coloring to visualize.
I used the same EditorSkySphere as you in the EngineContent from UE4…so what to do?
greets
Hello Raghu,
Would you be able to re-host your solution? I’m encountering the same problem and hole your solution can address it!
Thanks!
I have just done this and got the map to display correctly. You need to feed your Normalize node into a LongLatToUV node, then into your HDR texture sample. That goes into the Emissive and the result is as it should be.
That takes us up to the next level. Great potgins.
@peter – I suggest taking a look at the SM_Sky_Sphere; That one does not spit out that overlapping uv error.
HI RAG, GREAT WORK THERE….
I did as same as your tutorials but when I build lighting I get and error for the SKYSPHERE saying that has overlapped UVs and further saying 50% of bla bla bal…. 🙂
Please advice me for this…
Thanks Rag…
All the best..
I noticed the HDR in the Skylight is very limited range. There are no directional shadows at all. The result is basicallt just tinted occlusion.
Is there a known way to use ONLY an HDR to light a scene with directional shadows fromt he hotspots int he image – similar to how it is done in the VFX industry
thank man, great tutorial
How did you get those shadows?
Neither SkyLight or Directional Light seems to gerenate the shadows.
I tried everything in my own tests…
I just cant wait for your next tutorial!! It help so much!! thanks
Thank you so much for your explanation! this is a major help!!
I get and error for the SKYSPHERE saying that has overlapped UVs
Can you align a direct light with the HDRI sun and link to it? (for rotation)
Thanks!
Yes you can, I already answered this question in the comments. (reply to SAM)
I followed this to the letter, but am getting 50% overlapping UV errors on the skybox and the scene overall seems very dark. I am also getting issues with overlapping UV’s when importing archmodels assets (10% overlapping UV’s) even after using steamroller and looking at the second UV channel in UE4 as sucessfully flattened. I officially give up!
Hi;
Thank you for sharing your experience…
But I have shadows issue, as mentioned in some posts above;
I opened your project (HDRI_Setup level), added a simple asset, rebuild lighting (Production)… but NO SHADOWS..!! Although there were a directional light in the level
May be you should post a statement about this issue …
Best Regards
thanks this tutorial is really clear … !!! but the referential link is broken.
Tutorial File Download Link (Unreal Engine 4.10 and above) – https://www.dropbox.com/s/8gp9ze6mko8bi7v/Simple%20Extrior%20HDRI%20Setup.7z?dl=0
Do you have other one?
Thanks for share 🙂
Thanks for making this tutorial! It’s the only one I could find
A quick tip for someone sticks on the sky sphere uv overlap problem.
find “M_Procedural_Sky_MASTER_UE4″ material in Content Browser -> Engine Content, use this material for the skysphere, simply replace the texture”cube map” in the material by our own hdri map. the uv problem should be solved.
Maybe im late since the dropbox file is not there anymore someone still have that? Please post it thank you i cannot proceed without those.
Everything looked good so far but the only thing bothering me is that the quality(resolution) of the skybox seem to suffer. Even after selecting nomipmap there’s still a quality loss that can be seen and when comparing it with the original image, the difference is pretty obvious.
Any suggestion or solution about this?
P.S Nice tut btw keep up the good work!!
Skylight doesn’t take HDRI when using Specified cubemap….Am I Doing Anything wrong?
Just Wanted to thank you for sharing this amazing tutorial !
really appreciate it 😀
Thank you very much for sharing with us!
Thank you so much. This article was very useful.
great and nice infomration
Great article. Thanks for sharing it.
my entire model is black… hdri not giving enough light. level has precomputed visibility volumes precomputed visibility will not beeffective
Hi! First of all thank you so much for the tutorial! Very helpful! Is there a way to use HDRI together with directional light to keep the light shafts? Thanks!
+1 for thank you so much for the great tutorial!!
Hi,
Awesome tutorial! Thank you.
I am wondering if it is possible to reposition the SkySphere with the hdri with it? The problem I am having is the horizon of the hdri I am using is showing too much and I would like to lower the sphere in relation to my scene. I can move the sphere, but the image does not move with it.
Thanks,
Jeremy
Thanks for the tutorial
Greetings! Fantastic tutorial but I’m wondering if you could provide a new Dropbox download link for the tutorial file? Tnx!
When you ultimately do struck a give, you’ll nonetheless possess a excellent possibility of benefiting from actions.
https://www.dropbox.com/s/8gp9ze6mko8bi7v/Simple%20Extrior%20HDRI%20Setup.7z?dl=0 link is down can you replace it
Unfortunately there is something really bad working. HDRI just tints the scene, but there is no dynamic range – shadows are totally blured etc. And it is not about lightmap resolution. I think it does not use HDR but only LDR information.
Nice Post thank you this is an awesome tutorial
This is very nice information about HDRI. I will follow your Blog for new informations
Can you share the link to the setup again?
Thank you so much for showing how to disable autoexpose in project setting!
Great post, nice tutorial!
Thank you so much!
Hi! Thanks for the nice tutorial! Very helpful! This tutorial are super easy to understand with details explanation.
Can’t wait for the next tutorial.
I’m trying to follow along with this but the link doesn’t work for me to compare to my scene. I’m trying to use this to help light an interior scene. In my interior, everything is massively blown out. You mentioned changing the exposure in post process volume, but didn’t give details on that. Can you share any info on that? Thanks.
I work on Estates most of the Time with the Unreal Engine. And yes the HDRI works like a charm. I loke your Post i keep up from now!
my company Bitniex
A very well described and nice tutorial. Thank you very much! I will follow your blog in the future.
Thank you for providing this comprehensive guide to implementing 3ds Max and Vray lighting workflows in Unreal Engine 4. Your explanation illuminates how these diverse platforms can be skillfully harnessed to achieve similar results. Highlighting the importance of both natural and artificial lighting, HDRI usage, and understanding camera physics aligns perfectly with the arch-vis industry’s requirements. Your deep dive into the significance of understanding human eye adaptation and DSLR exposure in virtual rendering adds a unique perspective, showing how these real-world phenomena impact virtual environments. Your effort to simplify the migration between these software platforms, coupled with your focus on education and understanding of the fundamental principles, is greatly appreciated.
This information about HDRI is truly valuable. I’ll be keeping up with your blog for any updates.
Guter Artikel. Ich werde in den nächsten Wochen mit der Unreal Engine 5 meine ersten Schritte machen. Ich hoffe, ich bekomme das auch so gut hin.