When I first started learning Unreal Engine, I had to look so many tutorials and blogs to understand basic workflow required for creating Real Time Architecture Visualization. It was not easy at all to get help in this regard as there were almost no tutorials or blog associated with this topic.
Looking here and there for help, I got some basic idea of the workflow required to start importing my geometry in Engine, riding on the wave of my newly got knowledge I started importing objects, how tough it can be to export and import .FBX format? I was able to quickly import the basic structure of my room in the Engine, ignoring all the errors (As I was super confident of my new pseudo knowledge) – Bang, errors all around.
Soon enough (Actually after a while ) I was going to realize the intricacies and finer details required to get the errors removed and to bring in the geometry with all ‘prerequisites’, that were super critical for smooth workflow.
Here I am attempting to consolidate what I have learned during my struggle to create and understand basic workflow required to bring in your 3D files into Unreal Engine. Architectural Visualization requires a particular workflow to get best possible results in least amount of time.
I will be taking 3ds Max and Unreal Engine as the main tool for this tutorial, 3ds Max scripts to maximize workflow and will try to explain concepts like – Light Baking, Light maps, Light map resolution, extra UVW channels required and so on.
There are many different techniques and workflow present in Unreal Engine for properly lighting and building a scene, for this tutorial I will only be taking one scenario into consideration, that best suits Architectural Visualization for the moment i.e. Static Lighting scenario. When I say ‘Static Lighting’ it means – Lights and Objects are not moving or changing places. Everything is static.
Dilemma of second UVW Channel –
Unreal Engine uses Light Baking to store and add light information over objects similar to ‘Render to Texture’ in 3ds Max. To store the Light Illumination and shadow information over objects UE needs a blank UVW channel, so it can add that extra information onto the existing textures stored in default UVW channel. That’s the main reason all static meshes in Unreal Engine requires second UVW channel. Light Illumination and shadow information are stored in maps called – ‘Light maps’. Each individual meshes require light maps to be able to get the light and shadow information from Lightmass (Unreal Engine’s Renderer, based on photon mapping algorithm).
Even simply adding a second UVW channel will not do the job, as for light maps we cannot define the UVW mapping, it is applied on the whole objects in one go, i.e. we need to Unwrap each and individual mesh object covering it’s every face/polygon, so Light maps can be applied properly covering whole mesh.
It’s little difficult to understand all this without an example. So, I am creating very basic scene in which we can see all these concepts working in tandem.
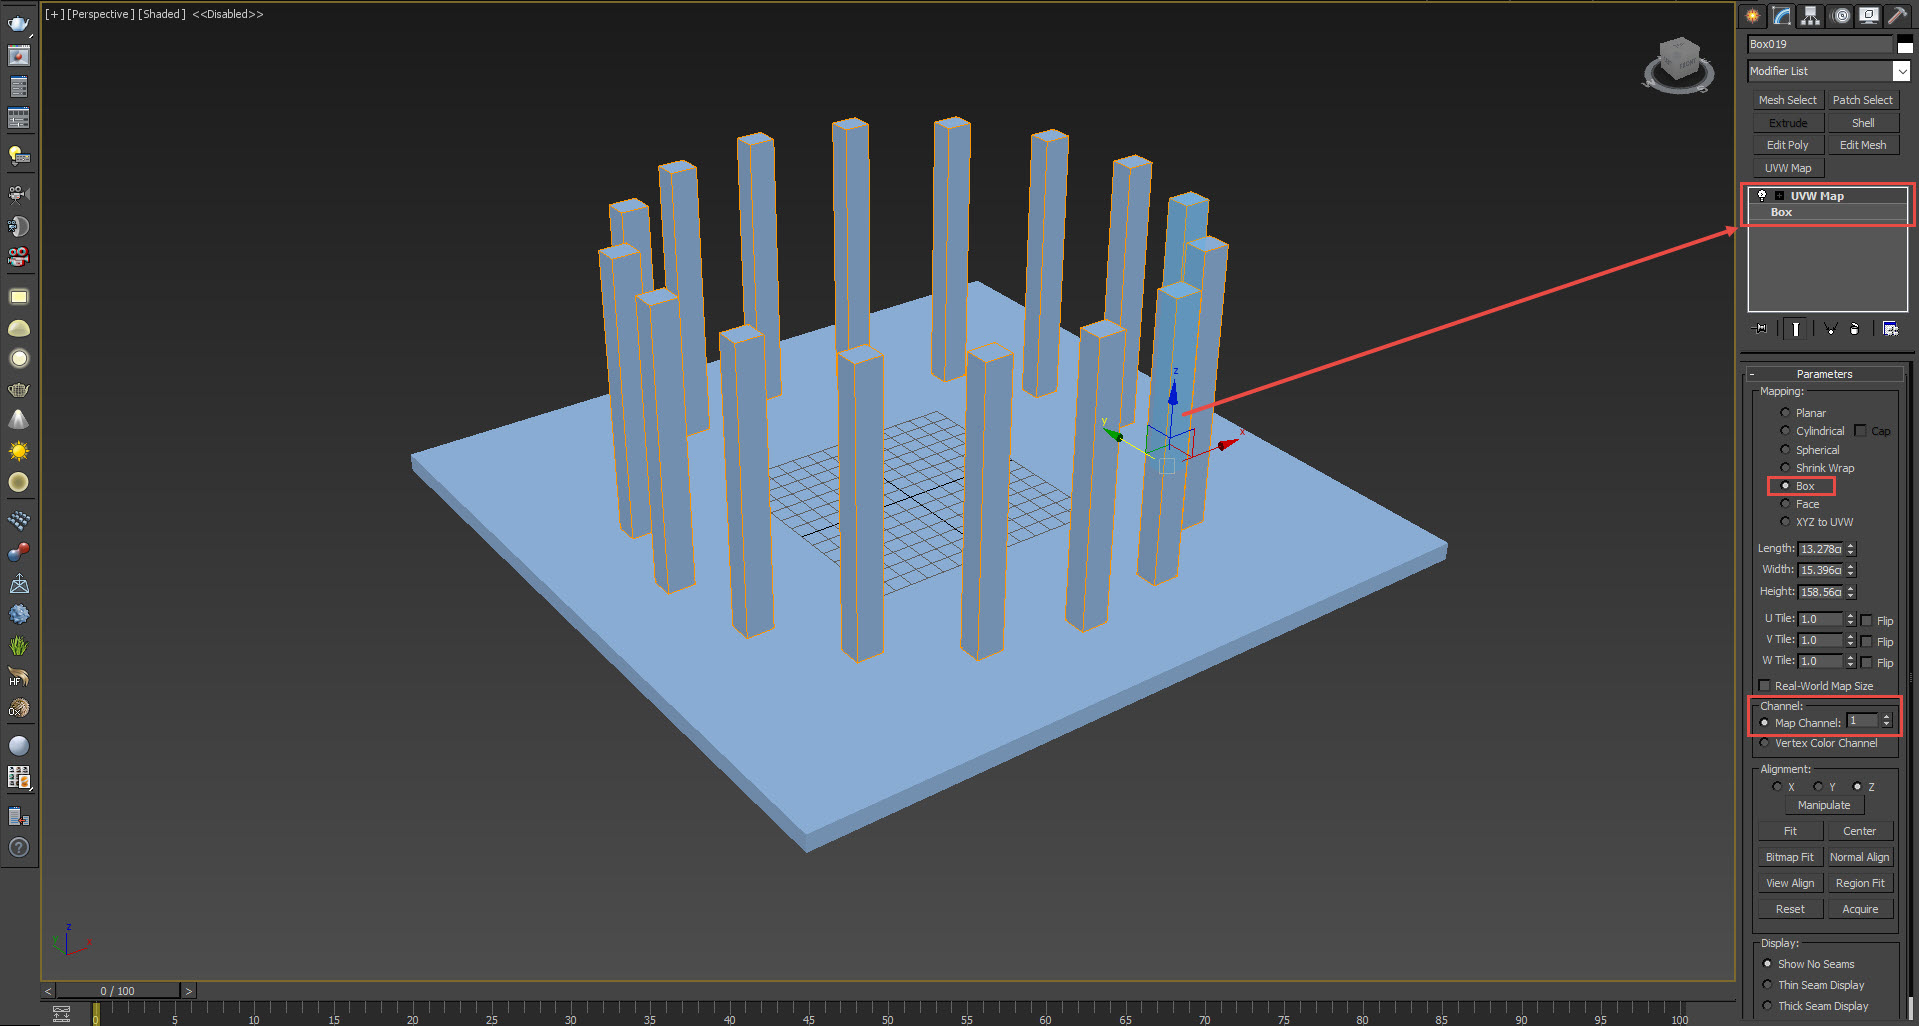
3ds Max scene file above contains some pillars arranged in circular pattern on square base, very basic. UVW map modifier is applied to each object with Box UVW mapping in Channel 1.
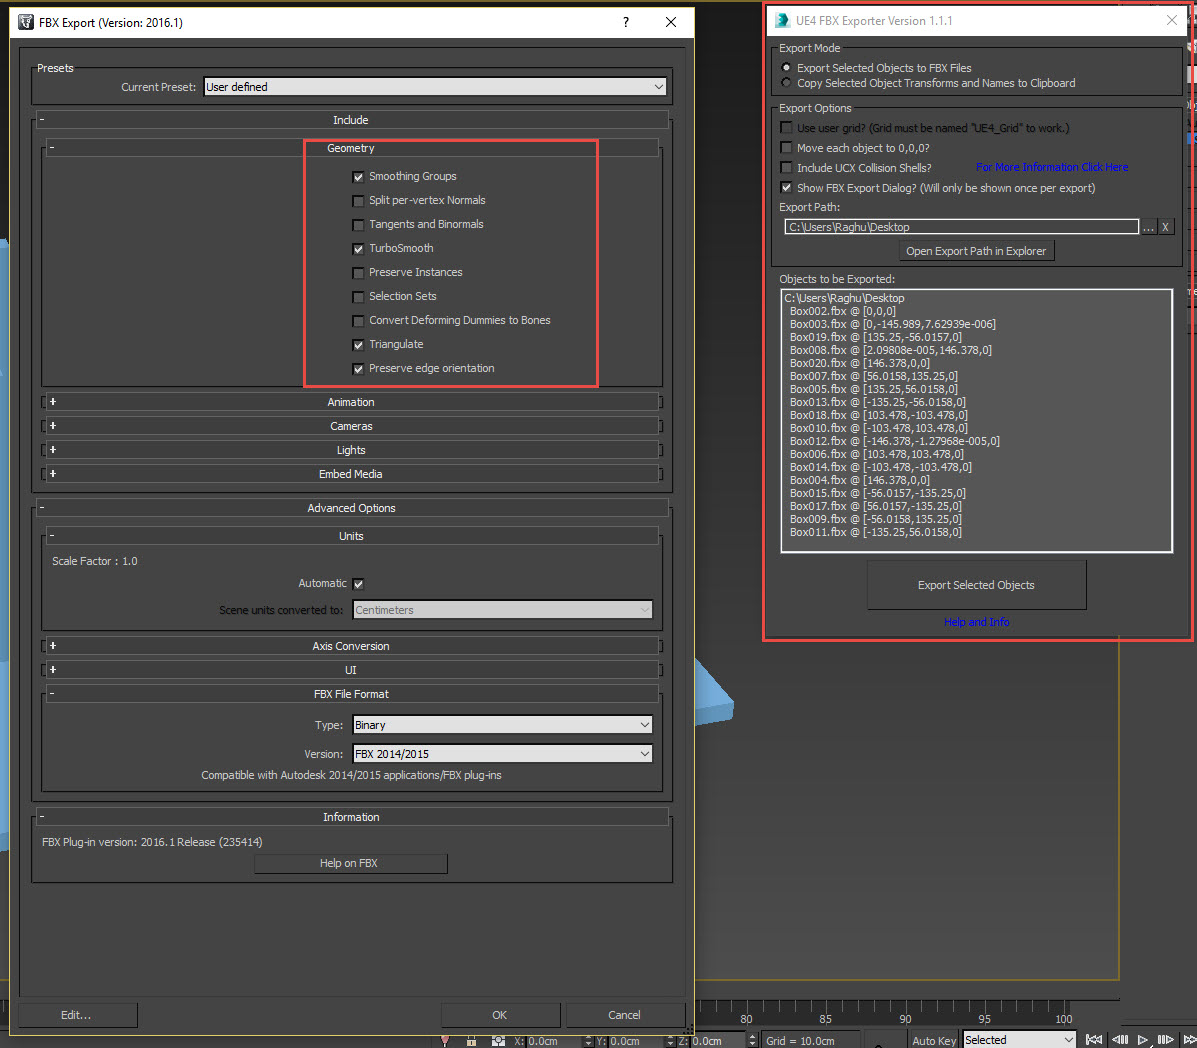
To export them all at once, we will be using an awesome script by Tom Shannon called – UE4 FBX Exporter.
http://www.tomshannon3d.com/2014/07/tstools-first-release-ue4-mass-fbx.html
Select all the objects and run ‘UE4 FBX Export’, use the following settings for the moment _
Open Unreal Engine and import all these exported objects into a new empty level. (Follow this tutorial for creating an empty level in Unreal Engine). Use these settings for importing the objects –
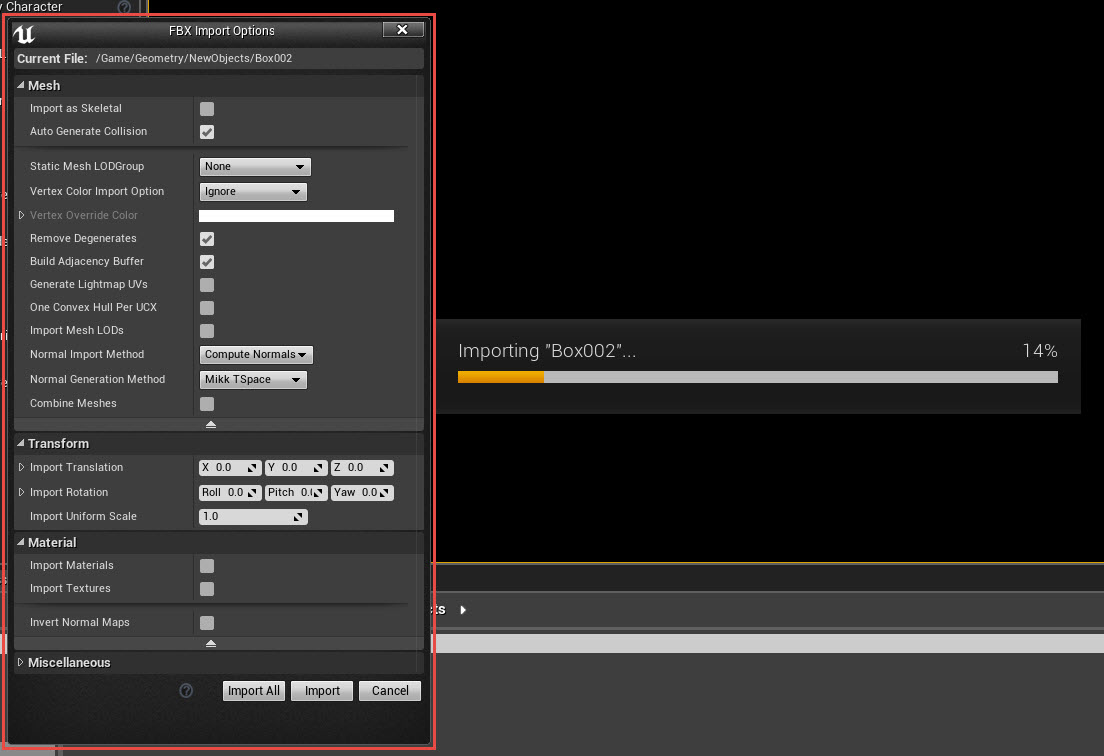
It’s important to uncheck ‘Generate Light map UVs’ (if it’s checked, UE will unwrap and create a second channel for light maps automatically) for the moment as we are trying to replicate the errors that we get when an object does not contain UV information for light maps. After importing drag all the objects into empty level and apply a simple material with white colour on the objects. Add Lightmass importance volume, Box Reflection Capture, Post Process Volume and a point light in middle of the pillars. Picture below.
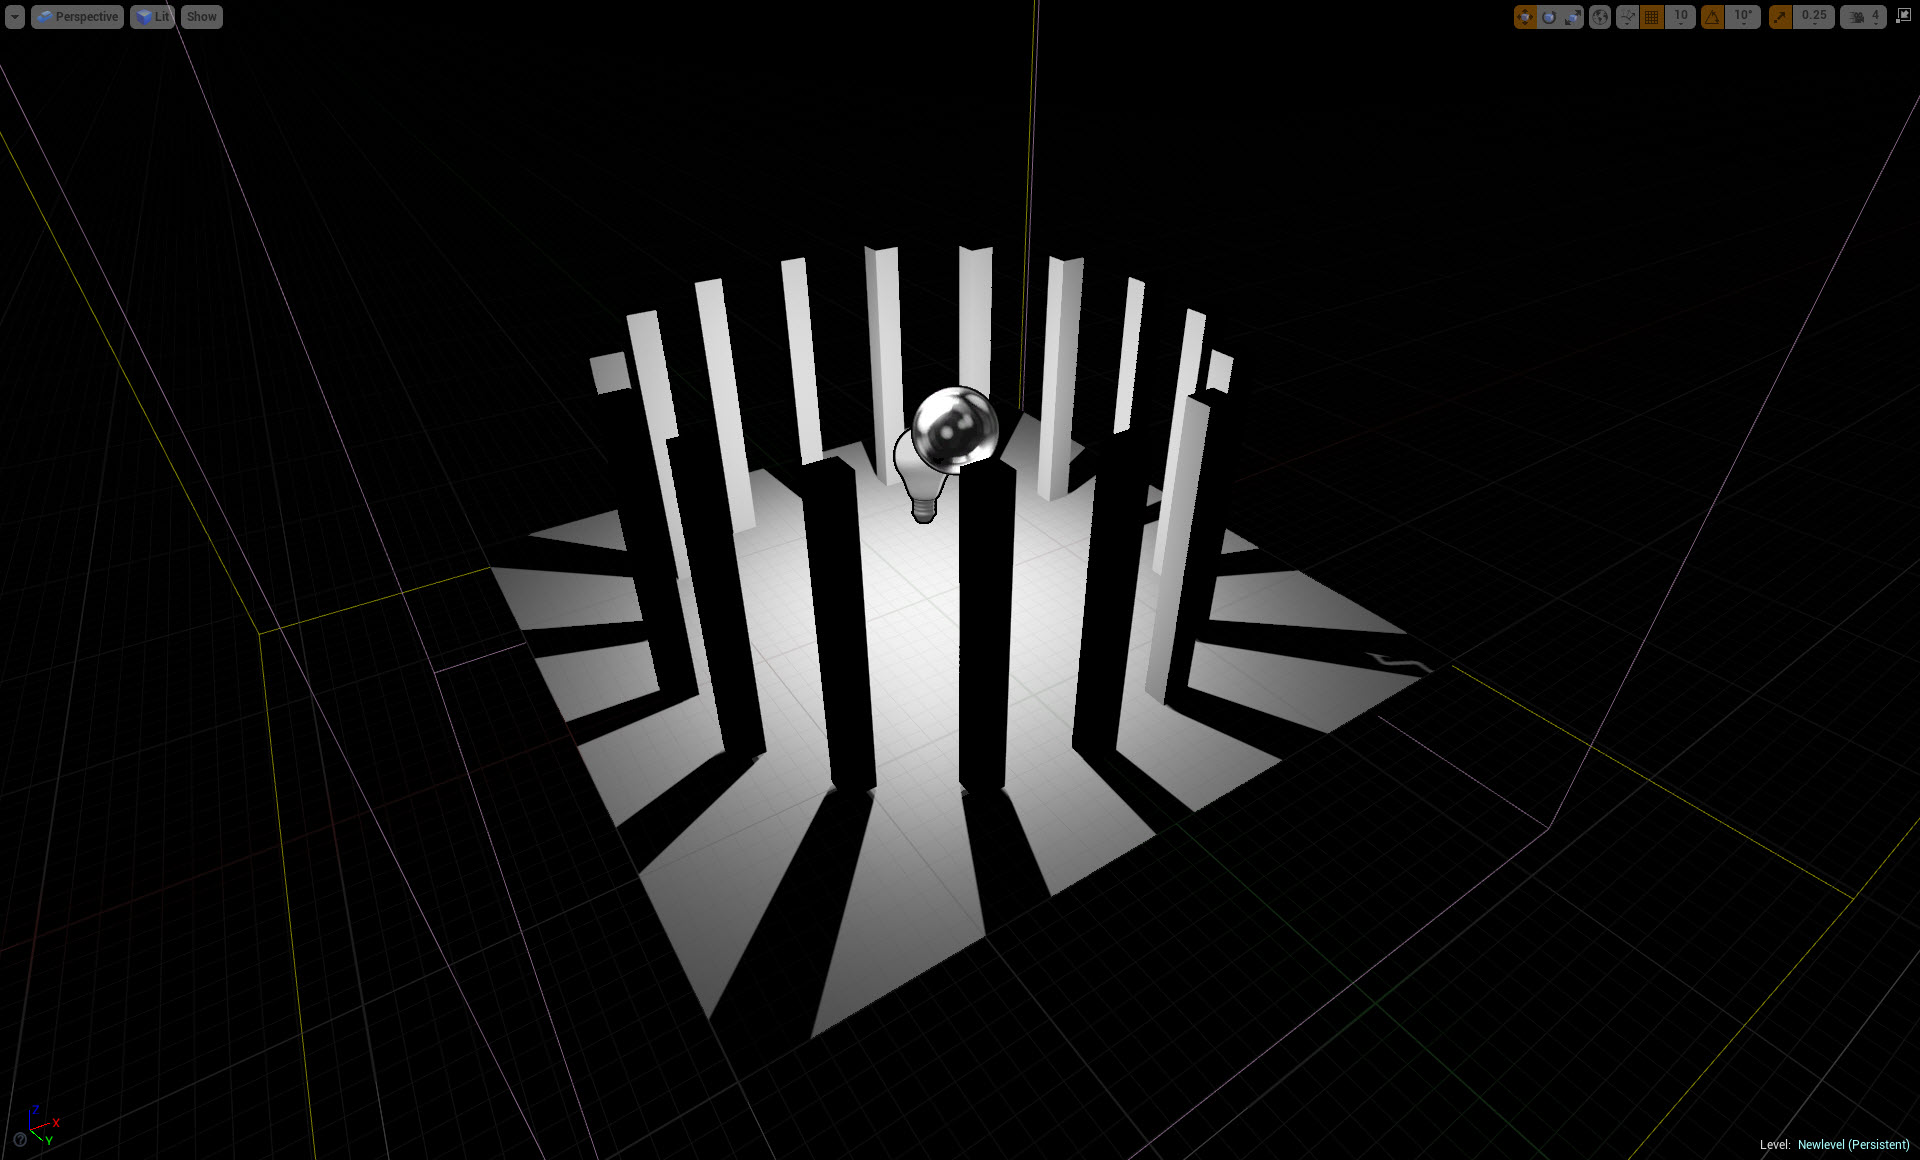
Now build the scene on default settings. You will be greeted by errors all over and all objects will render black.

So why we got these lightmass errors? It’s simple, as there is no UV Channel defined for Light maps, UE is using single UV channel for Texturing and Lightmass information and we have not Unwrapped the object at all for the given UV channel, we just applied Box UVW Mapping.
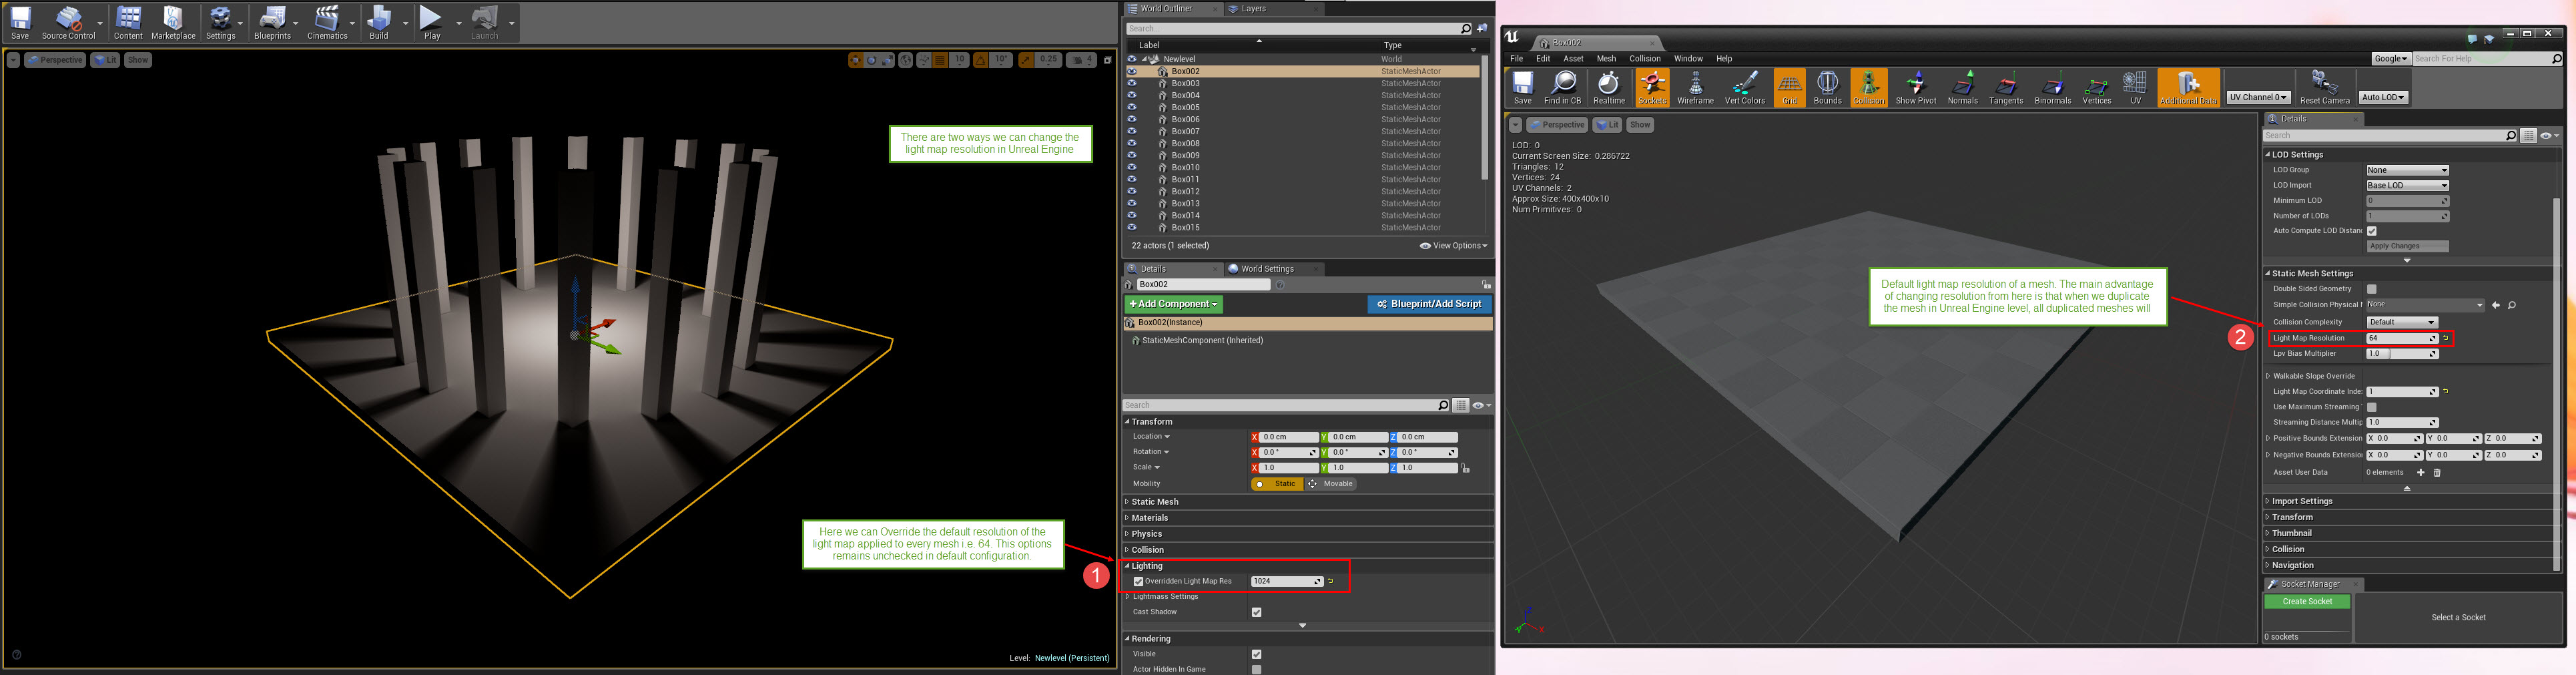
Let’s see where all the light map settings are for each individual object.

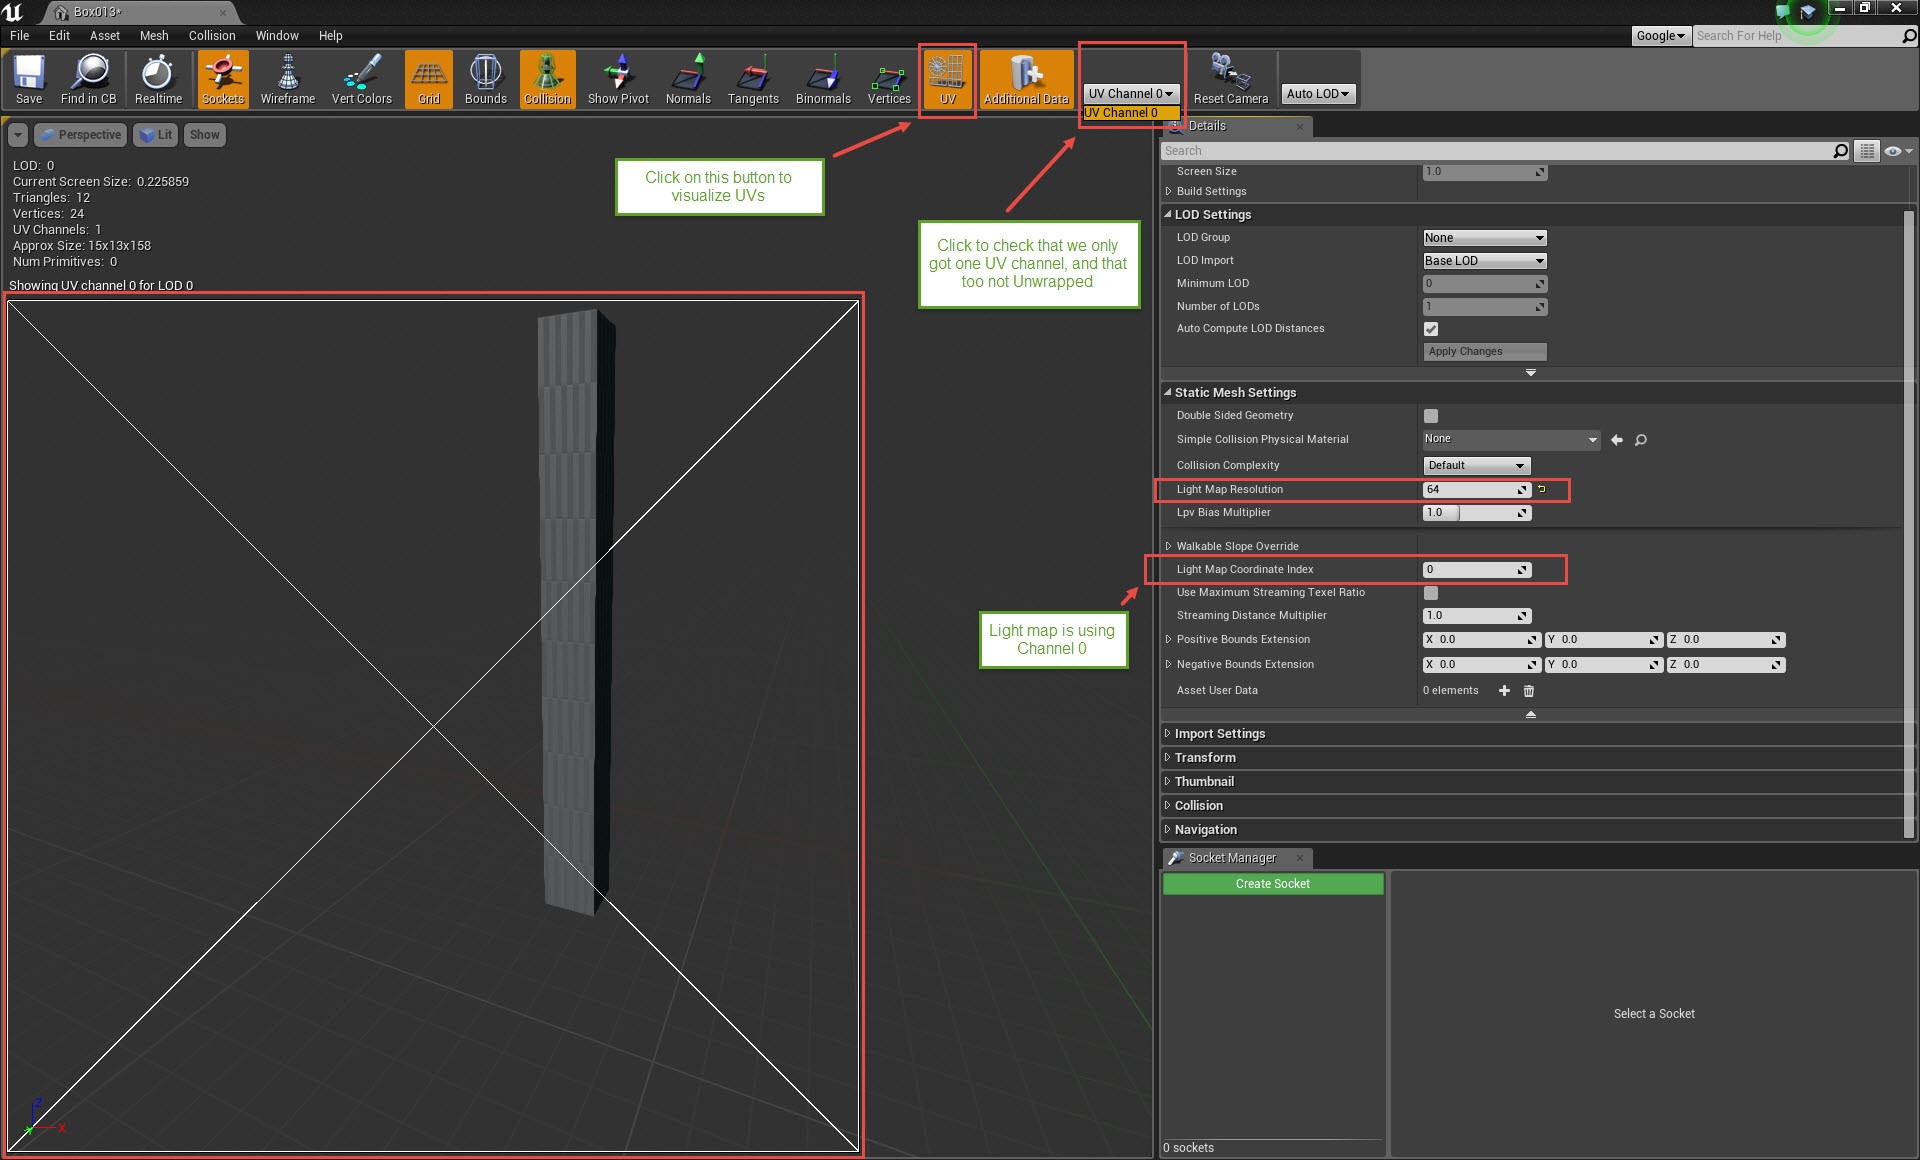
As you have probably noticed, UE is showing UV Channel 0, but we assigned UVW Mapping on channel 1 in 3ds Max. That’s nothing to get confused with, UE uses Channel Numbers starting from ‘0’, i.e. if you assign two different UV channels on an object in 3ds max as channel 1 and 2, Unreal Will show them as UV channel 0 and 1 respectively.
So how to solve these errors and to add second UV channel to all objects with Unwrapping?
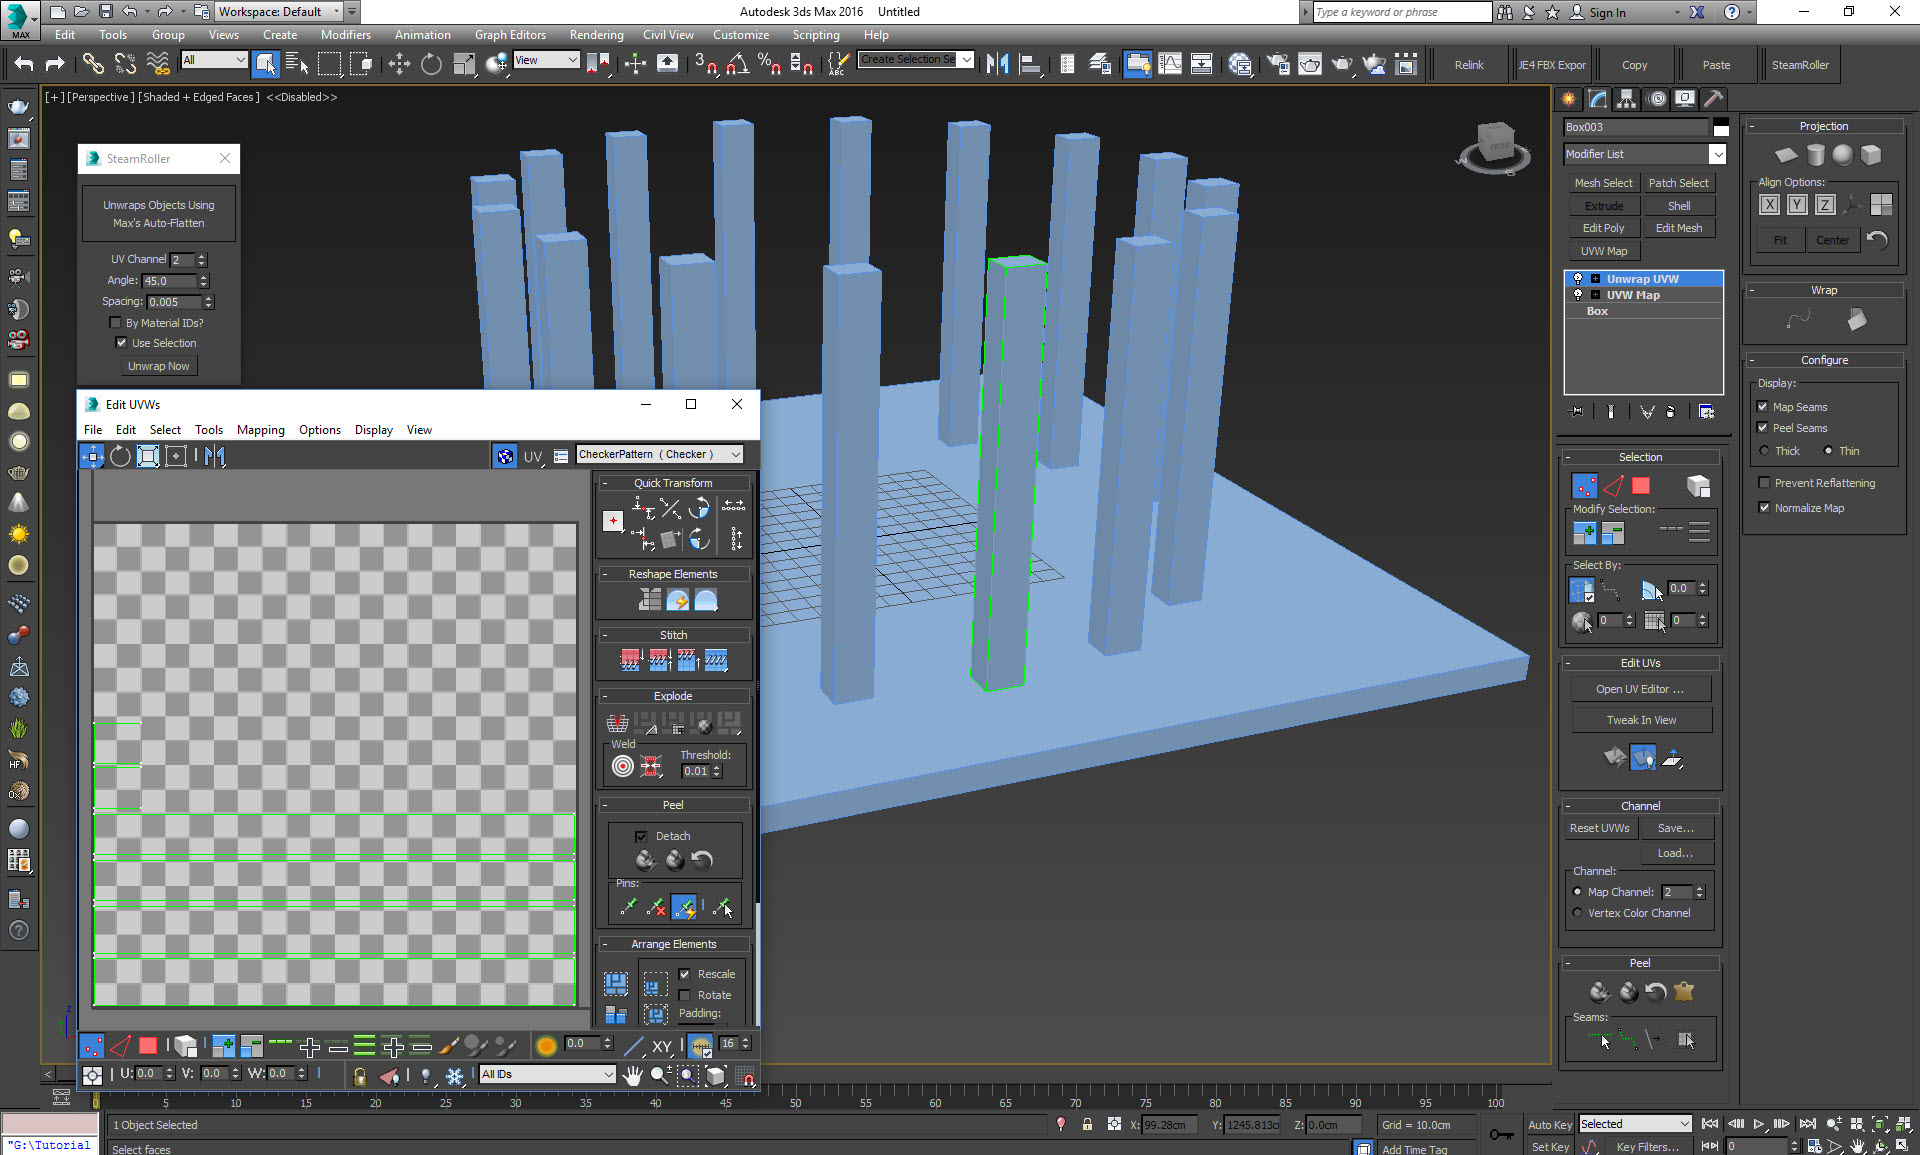
To do this efficiently and easily we will be using another awesome script called – ‘SteamRoller’
http://www.scriptspot.com/3ds-max/scripts/steamroller
Which basically adds Unwrap UVW modifier with Flatten Mapping on different channel (By default Channel 3), it helps in automation of the process of Unwrapping individual objects on separate channels. Let’s start by selecting all objects at once and run the SteamRoller Script. For the moment run this script with default values (will be explaining individual settings later)
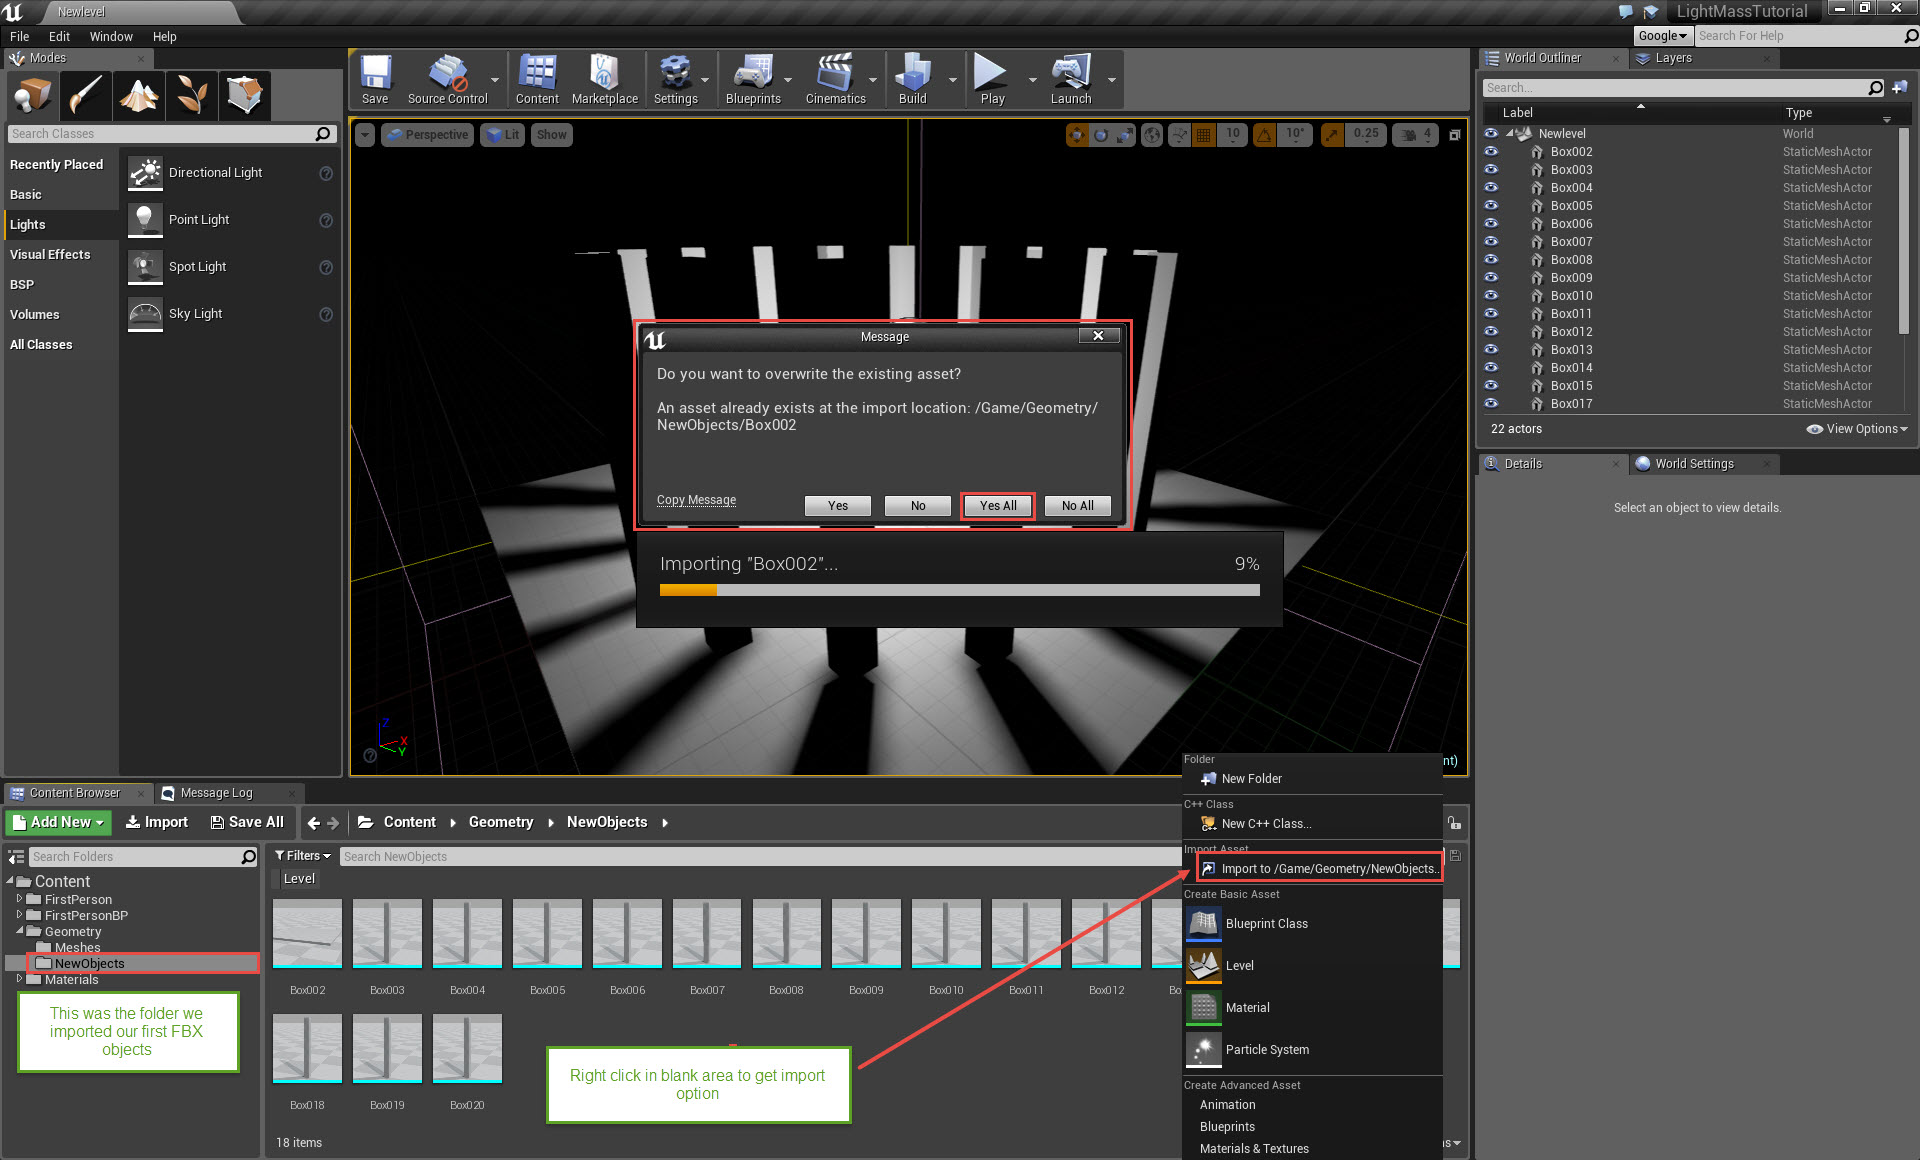
Now again we have to reimport all the meshes in Unreal Engine with added second channel for light maps. Let’s first export all the objects again with help of UE4 FBX Exporter and replace the old FBX objects saved earlier. In Unreal Engine’s Content Browser just replace the previous imported objects with new ones by importing all the new objects in same folder as earlier and clicking on ‘Yes all’, by this method you will not be required to drag and drop meshes again, it will simply change the reference of meshes in level by new objects we just imported.
Now as we have added second channel to our objects for light maps with proper unwrapping, let’s check how the things are looking now in mesh properties.
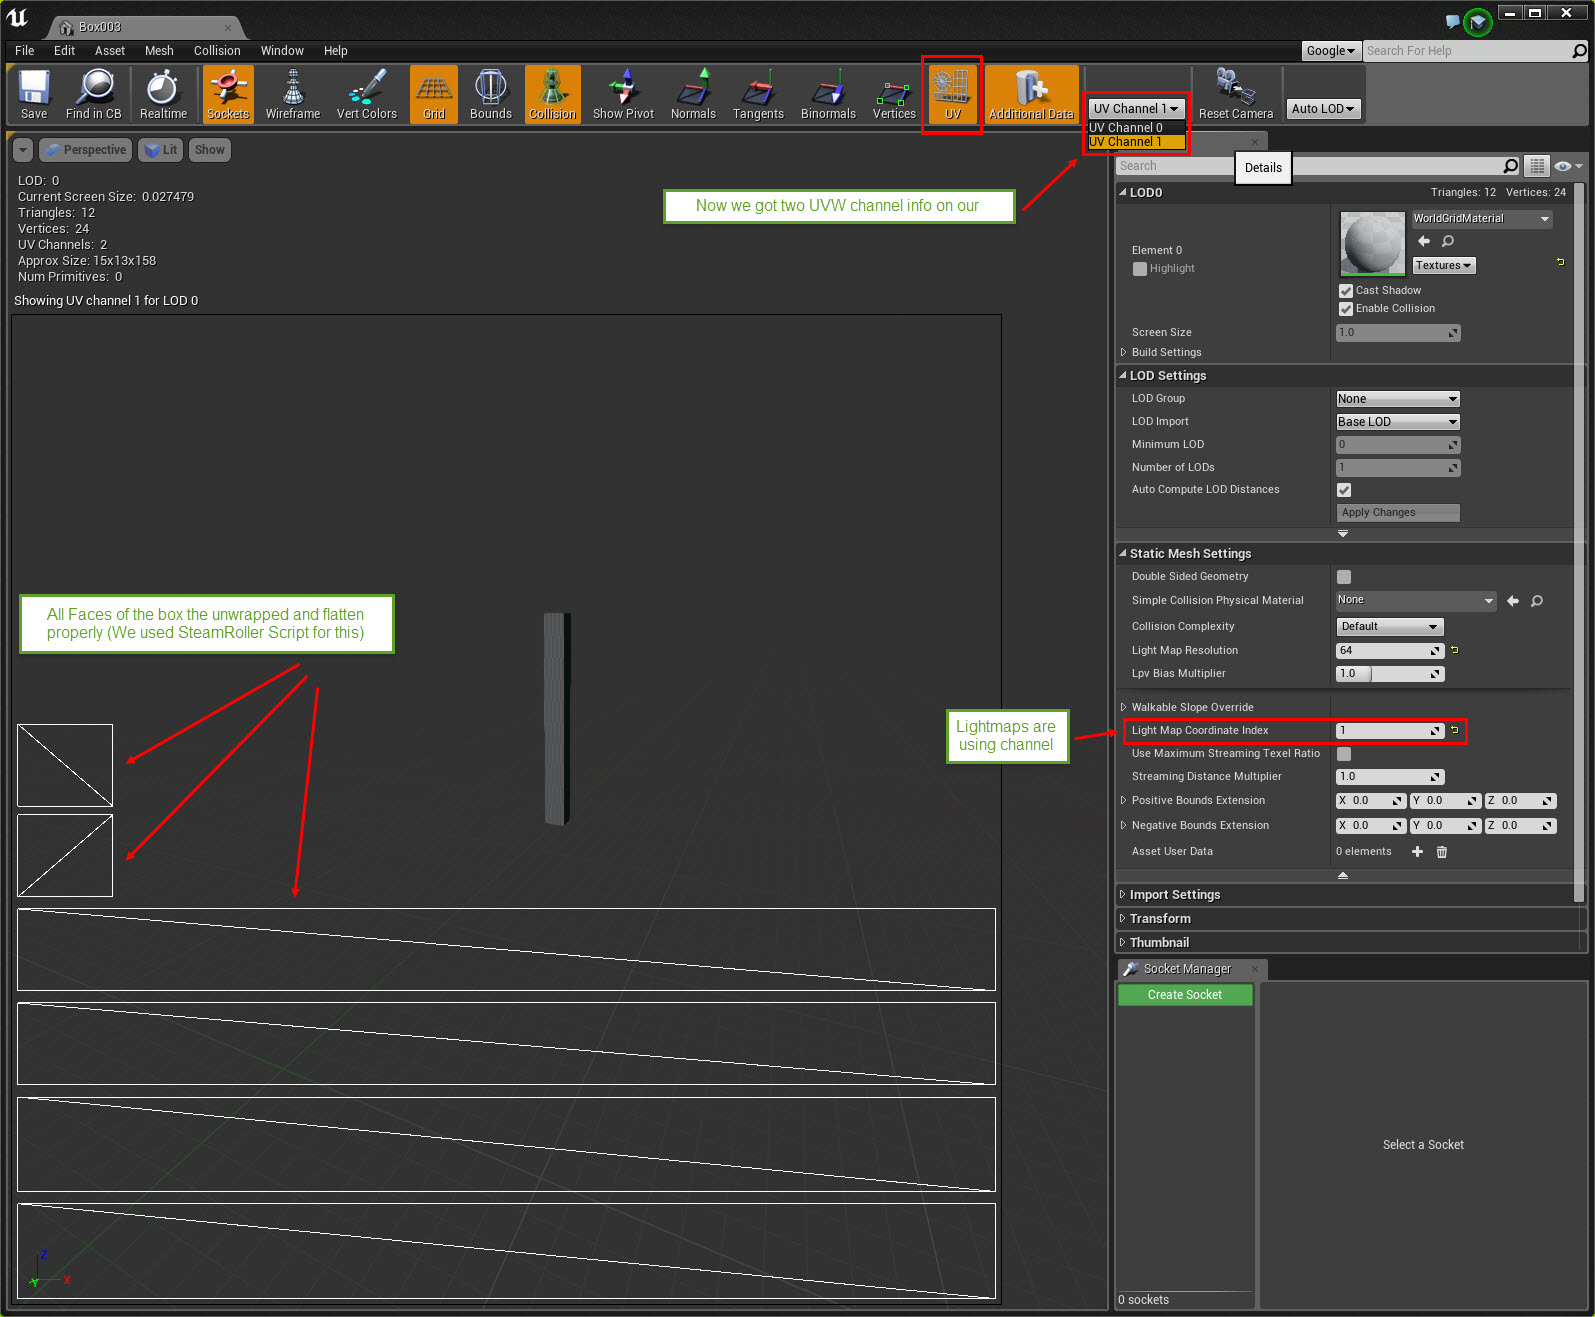
We can see that mesh now have second UVW channel with unwrapping info which we added using SteamRoller script in 3ds Max.
Let’s rebuild our scene again to check if we were able to remove the blackness from geometry.

I hope through this example I was able to clear some of the doubts regarding the UVW mapping workflow in Unreal Engine.
Now as we have basic understating of the UVW workflow, we can divert our attention to optimizing meshes for better light map resolution and baking time.
Light map Resolution –
Resolution of the light map taken to store the lightmass illumination info into the meshes. Higher the resolution, better will be the quality of baked shadows with greater build times i.e. Lightmass build times are directly proportional to the Light map resolution of the underling meshes.
That’s the main reason we need to approach Architectural scenes differently because we need the best quality contact details and shadows in our scenes. Of course we can go ahead and increase the light map resolution of every mesh in the scene, but that will increase our build times exponentially making it impossible to build in reasonable amount of time.
I personally like to break certain components of scene into individual objects like walls, ceilings and floor. Here is an example of this work flow in my test file.
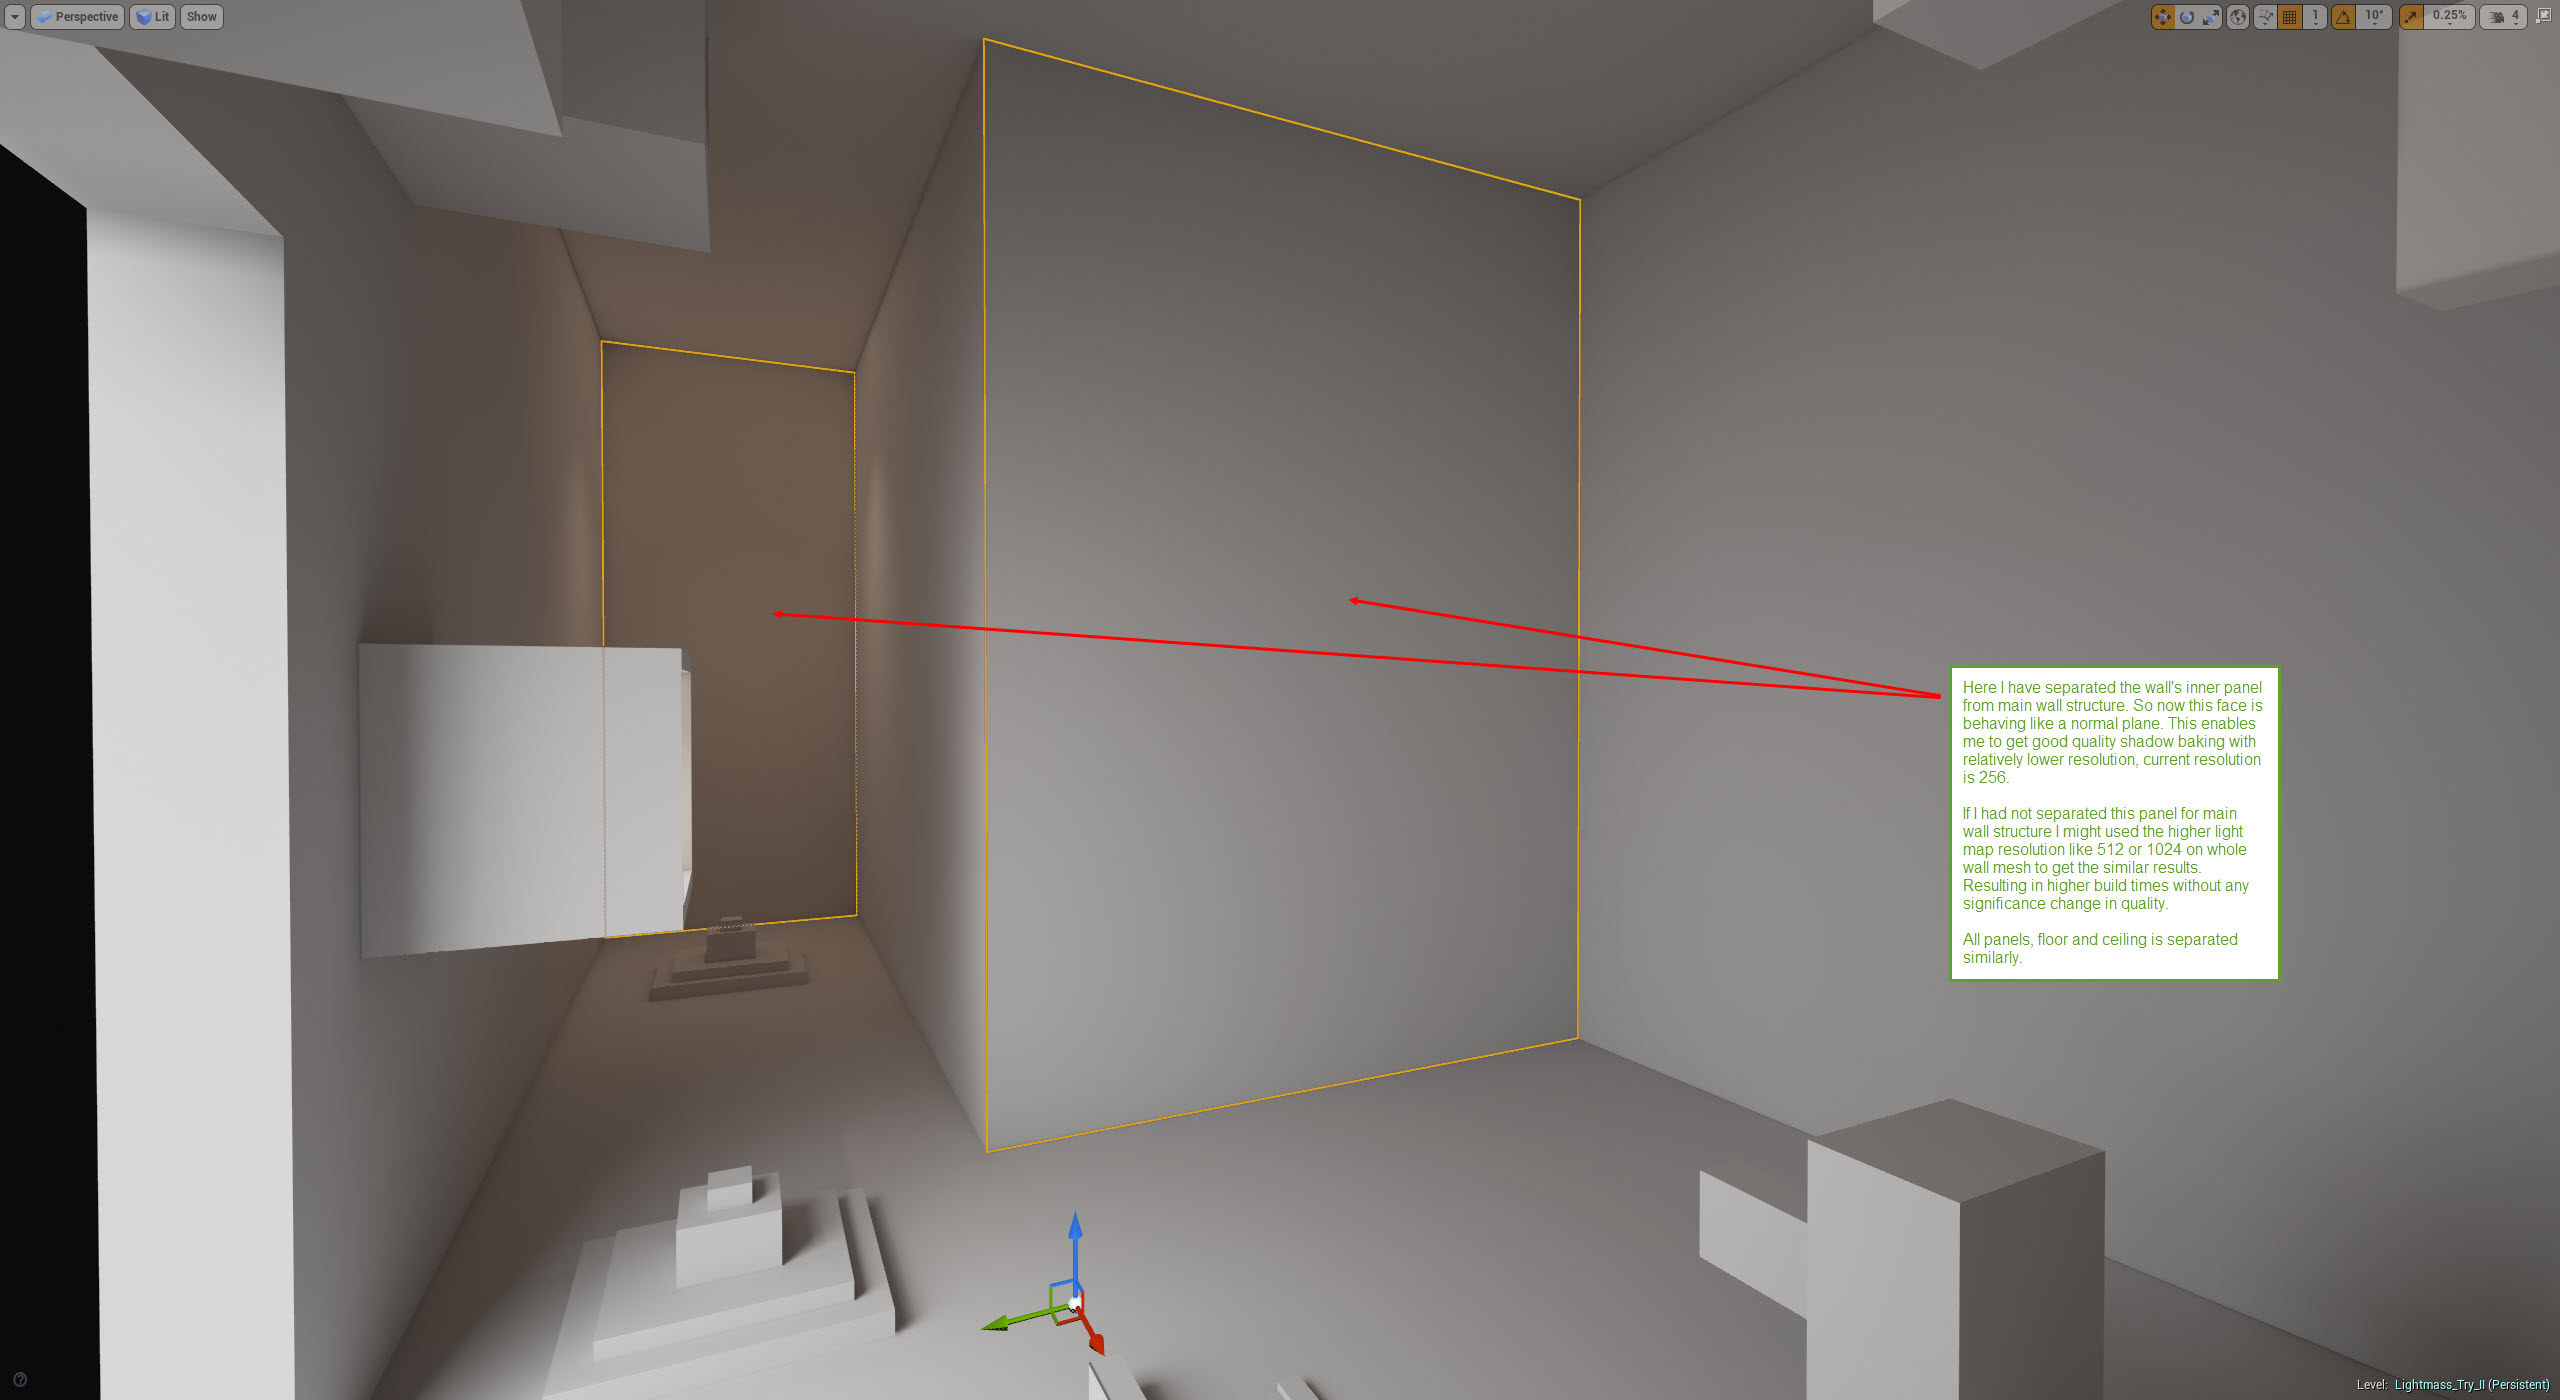
Breaking larger components into small mesh objects whenever possible enabling me to use lower resolutions with good quality without increasing the built times.
I will be updating this blog whenever I get free time.
I am kinda waiting for the next part 😀 great tutorial! Subscribing!
Very well explained , very useful.
Thank you!!
Hi Raghu, your works are awesome! This tutorial is very helpful, Thanks a lot. Waiting for your next tutorial. Cheers
Awesome tutorial Raghu 🙂
your hard work is highly appreciated .
Waiting for the next tutorial friend.
Cheers
Thanks for a great start to what is already shaping up to be the most useful and interesting of reads. I have been having the most troublesome time with getting good light maps and lightmap uv’s. Really looking forward to finding out a solid process of getting great quality and efficient time.
Cheers!
Image: http://rag3dviz.com/wp-content/uploads/2016/03/Lightmap-Properties.jpg is used twice
Thanks Bimbachi, I have replaced the image with correct one.
Your story was really informative, thanks!
Raghu:
Fantastic tutorial and it’s our good luck to be able to learn from your “trials and tribulations!”
I have a problem when I use the TS Tools you recommend. I am not picking the “move to 0,0,0” option when I export to separate FBX objects. When I import into UE4, all the objects have the same pivot point, so that all the columns are in the same location. All objects have coincident pivot points. I tried another 3d model in Max and the same thing happens when I import the FBX.
Any ideas on what I am doing wrong?
Thanks in advance – Art
Thanks. Very informative!
You are master!!!
Please! can you make a premium tutorial for architectural visualization?
Very helpful tutorial.. thanks so much!!
Btw, can you please explain why you use “Steamroller” script to create light map UVW channel instead of using “Generate Light map UVs” option (while importing meshes into UE)???
Best Regards
I used “Steamroller” only because of predicted results and ease of use with multiple objects at once in 3ds Max. I highly recommend manual unwrapping for complex furniture meshes and important object as to get good results without any need to increase the lightmap resolution.
You´re the best man!!
That´s the best tutorial I´ve found on the internet
Hope you make more soon…
Thanks!
I wanna say THANK YOU!
good job , well explained
Just tell you, you are great. Many thanks for sharing your tutorials.
Thanks
This is a great tutorial! How do you have the “additional data” button? Is it a plug-in? Can you send a trial? My mail: dianzgh2005@gmail.com, thank you!
thanks a lot!!! finally i found a good person sharing archviz tuts the way I get it cuz i’ve been working with 3ds max and now i’m going to work with ue4.
i had exactly these lightmaps uv issue and that gave me a very good understanding what’s going on!
and of course these awesome scripts…
Your style is really unique compared to other people I’ve read stuff from.
Thank you for posting when you have the opportunity,
Guess I’ll just bookmark this page.